6.s081 Lab: Xv6 and Unix utilities
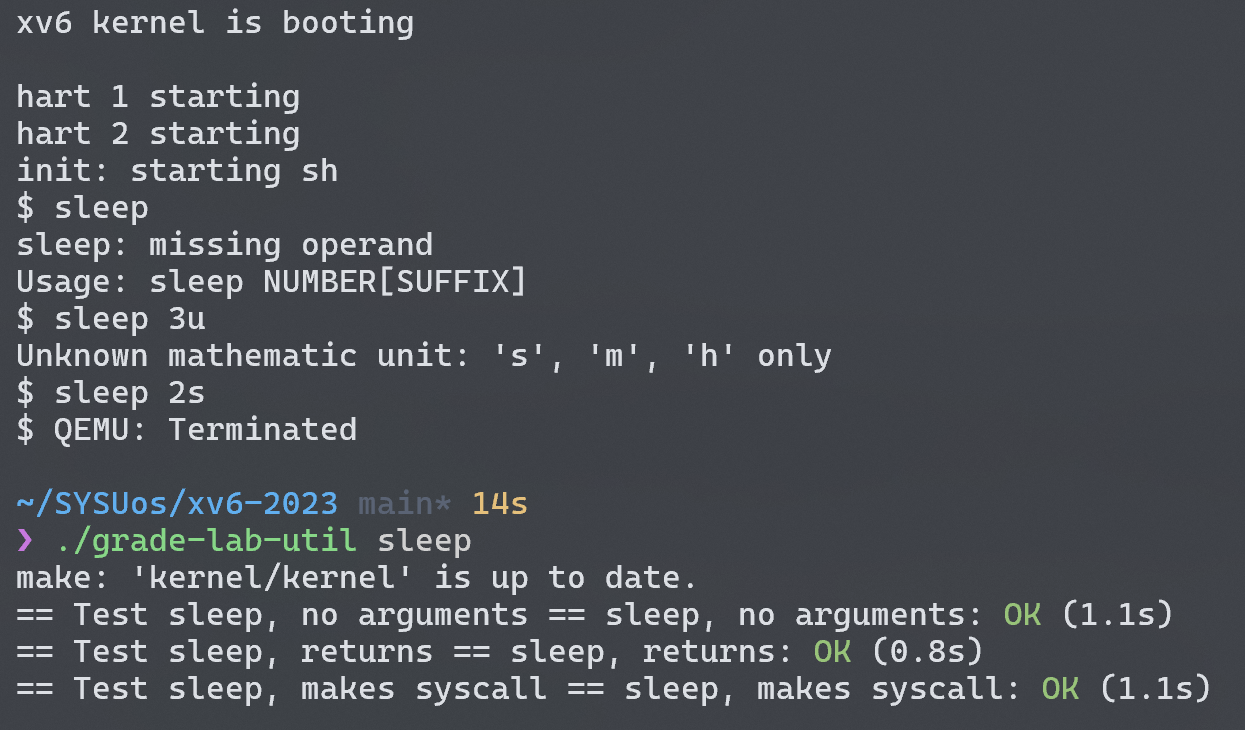
sleep
Implement a user-level
sleepprogram for xv6, along the lines of the UNIX sleep command. Your sleep should pause for a user-specified number of ticks. A tick is a notion of time defined by the xv6 kernel, namely the time between two interrupts from the timer chip.
实验要求实现一个 sleep 命令行命令sleep.c,在实现中调用的int sleep(int)是 xv6 提供的 sleep syscall 的系统调用封装,通过链接user/usys.S跳转到实际内核代码的实现sys_sleep:
1 | .global sleep ; 声明 sleep 为全局符号,可供外部调用 |
内核的sys_sleep实现:
1 | // kernel/sysproc.c |
在用户态中传入的参数会通过argint获取,n即代表睡眠多少个时钟周期,每一过一个时钟周期,clockintr()都会使全局变量ticks加 1,以此模拟时间的变化。为了保护共享变量ticks,实现中使用了自旋锁tickslock来保护对变量ticks的读写,如前面时钟中断对ticks的写操作,以及上面对ticks的读操作。
acquire()获得锁后,通过sleep(&ticks, &tickslock)实现单次 tick 的进程睡眠模拟。这个过程产生一个问题:进程带着锁tickslock睡眠,那么时钟中断就无法修改ticks。不过我们看sleep的实现可以知道,过程会先获得进程的锁acquire(&p->lock)再释放ticks的锁 release(lk),因此不会发生死锁!
进程的锁的作用以及sleep接下来的具体行为涉及 xv6 process进程概念的定义,会在报告后面解释分析后再回过来看void sleep(void *chan, struct spinlock *lk)。
以下为测试结果:
pingpong
Write a user-level program that uses xv6 system calls to ‘‘ping-pong’’ a byte between two processes over a pair of pipes, one for each direction. The parent should send a byte to the child; the child should print “<pid>: received ping”, where <pid> is its process ID, write the byte on the pipe to the parent, and exit; the parent should read the byte from the child, print “<pid>: received pong”, and exit.
注意匿名管道的数据传输是单向的,为了在父进程和子进程之间双向地传递消息,我们需要创建两个管道:一个数据从父进程流向子进程,另一个数据从子进程流向父进程。过程为:
- 父进程发送消息给子进程
- 子进程读到消息并响应到终端
- 子进程发送消息给父进程
- 父进程接收消息并响应到终端
第一次实现发现打印出来的消息相互交叉,产生终端输出竞争!
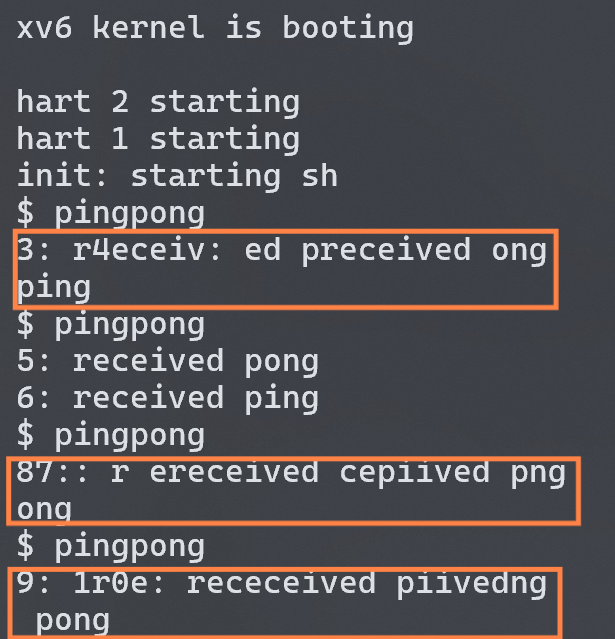
发现问题后我猜测了出错的可能是 xv6 提供的 read/write没有实现互斥,即不保障原子性(可能性很小…),由于 parent 和 child 之间没有同步,导致两个进程同时通过printf()向终端输出,导致了 race condition 。
由于我们使用管道(也是一种文件)进行读写,sys_read和sys_write分别调用的fileread和filewrite会接着调用piperead和pipewrite。在对管道进行操作之前,会尝试acquire(&pi->lock),因此可以保证 read/write的原子性。
既然read/write满足原子性,那就是父子进程之间同步的逻辑编写上出现了问题,于是发现确实如此:
1 | // 部分逻辑代码 |
子进程调用read会被阻塞,但当父进程write时,子进程接收消息,然后两个进程同时调用printf向终端输出!正确的逻辑应该是父进程调用read被阻塞,直到子进程write才会调用printf。正确逻辑为:
1 | // Parent process |

回过头来我们再看printf竞争的具体过程。printf在va_start解析完参数列表后调用vprintf:
1 | // user/printf.c |
它将格式化字符串写入文件描述符为fd的文件中,在printf中传入 1,即标准输出。除去转义字符处理过程,vprintf的核心是putc,即单个字符的输出。putc调用write系统调用是原子的,但对整个字符串的输出不是原子的,因此上面 parent 和 child 两个putc流就交替在了一起并发地输出字符串。
vprintf中的一个疑问:c = fmt[i] & 0xff的作用是什么?为什么不声明c为 char?
c被声明为 int 类型,fmt[i]是有符号的 char 类型,如果fmt[i]是负数(如0x80),那么直接赋给 int 会进行符号扩展,导致c的值变为0xffffff80,显然不在 ASCII 编码的范围内(0~255)。 fmt[i] & 0xff 会强制将 fmt[i] 转换为 无符号 8 位值 ,清除高位符号扩展,确保 c 始终是 0~255 的正数。此处声明c为 int 是为了匹配标准库的 getc/putc 的规范 。
find
Write a simple version of the UNIX
findprogram for xv6: find all the files in a directory tree with a specific name.
这个任务的完成涉及 xv6 文件系统接口以及“文件”的定义。在实现之前需要参考ls的实现来初步了解 file system。
文件描述:
1 | //--------kernel/fs.h----------// |
文件名不能唯一描述文件本身,对于每个文件使用唯一的inode(32-bits 无符号 int)来限定。Unix 将资源视作文件,因此设备也是一种文件,通过T_DEVICE来定义。同时,文件夹也是一种文件(T_DIR),它是一个目录条目dirent的序列,其中每个dirent是inode引用和文件名name的序列对。文件状态stat中的字段nlink是指所有连接到该inode上的文件,对这些文件的所有操作都会映射到同一 inode 上。
文件系统接口:
1 | // system call |
open与fstat系统调用的解耦以及用户态stat库函数:
1 | // user/ls.c |
在 ls 的查询文件实例中,传入的path会被作为open系统调用的参数,成功打开文件得到文件描述符(file descript)。接下来调用fstat的系统调用会解析该文件的状态stat,这里我们最关心的字段是文件类型 type 。
根据文件的不同类型对文件信息的输出也不同。如果是文件目录的话,我们需要遍历该目录:while(read(fd, &de, sizeof(de)) == sizeof(de))。每次read读取一个目录条目并写在 struct stat de中。之后一系列对buf写入的结果是它保存了源目录下的单个文件(当然它可以是文件,设备或者子目录)。
为了继续读取该文件的状态,原本应该像一开始一样先打开文件再解析,而 ls 直接调用了一个库函数 stat,它实际上就是封装了 open ,fstat 和 close 三个 syscall 。
- 再看系统调用
read
- 对于文件的 read:
在find的实现中,对于T_FILE的处理我照搬了read(fd, &de, sizeof(de)),使得查询逻辑出错。实际上对于 file 我没有必要去解析文件状态(需要的话实际上也因该是用stat),直接提取path中的 base name 就行了。
1 | case T_FILE: |
- 对于设备文件的
read:
一开始我忘记了还有设备这种文件,于是每次读到/console都会跳到我的 default 语句。后面意识到后把T_DEVICE的处理和T_FILE和到了一起,而我的 file 处理逻辑中又有错误的read,此时出现一个巨大的 error :read读取设备文件不会通过文件系统,而是调用的设备驱动程序,产生阻塞!因此每次读到/console就卡死了 😦
了解了 xv6 基本的文件系统定义 find 的处理逻辑就很清晰了,其实和 ls 的差别只在对于 file 和 device 我们不用解析文件状态。根据最初的 path 我们解析查看文件类型:如果是设备或者文件,我们匹配 file name 并直接打印路径;如果是文件目录,我们则需要循环读取每一个条目并递归 find 。
实践中有一个点我没有注意到,那就是目录文件的序列中有两个条目,分别是当前目录 "." 和上一个目录 ".." ,不能递归进去!实际上 Lab 对此行为有提醒:
Don’t recurse into “.” and “…”.

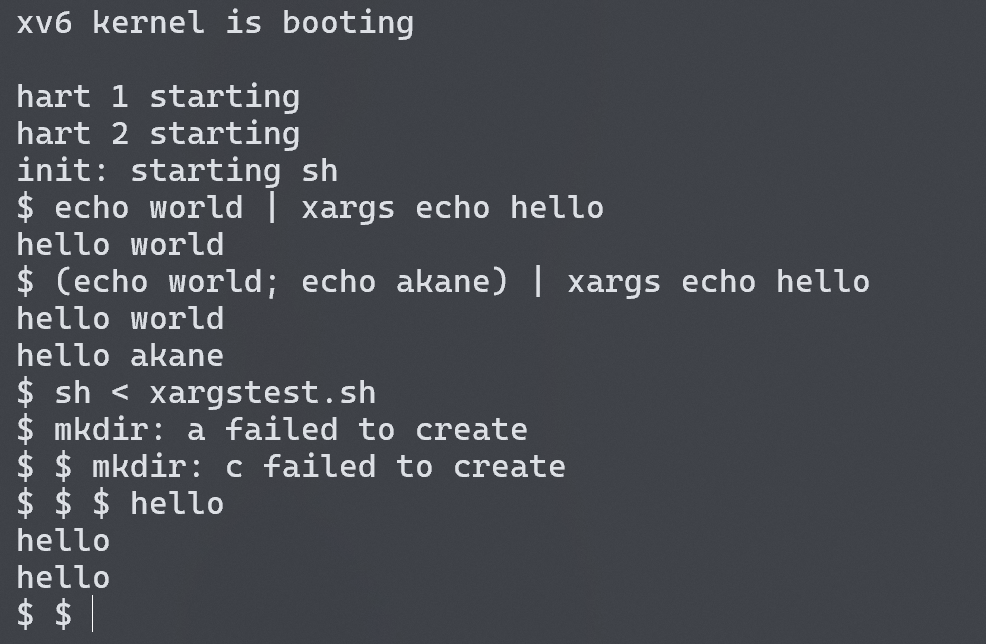
xargs
Write a simple version of the UNIX xargs program for xv6: its arguments describe a command to run, it reads lines from the standard input, and it runs the command for each line, appending the line to the command’s arguments.
这里我没有理解好 xargs 的功能,误以为把所有的 stdin 结合起来然后传递到下一个指令作为参数。实际上应该每读取一行作为一个 append 的参数执行 xargs 后面的指令。
举个例子:
1 | $ echo from world | xargs echo hello |
这里第一个 echo 会输出到 stdout from world\n,xargs 从标准输入中读取一行,然后加在 echo hello 这个“命令”后面,形成 echo hello from world\n。
注意每次读取一行都需要去除末尾的换行符,同时注意传递给 exec 的 argv[] 的最后一个参数得是 NULL !