Git二周目学习
前言
上半年搭建完博客后初步了解了一下 git 的常用指令,第一次了解 git 这个版本控制工具,之后又零零散散地通过不同慕课和视频(Missing semester,南大 ICS和技术蛋老师)重温,可是我发现在学习过程中并没有很深入地去了解 git 的相关概念和具体操作之间的关系,实际使用中还涉及与远端仓库的交互,因此在做实验时总是搞得一团乱麻 (screw up)。学艺不精最终在实践中带来恶果,其中种种因缘和合且按下不表。最终我在痛定思痛后决心开启新周目的 git 学习,希望能真正地了解git,以后遇到问题不至于连 CSDN 的解决方法都看不懂。
学习内容
这次的学习的参考资料主要是 Pro Git,并且注重学习其中的具体概念。本篇博文会补充在一周目博文中没有记录的 command,同时通过具体实操例子来阐述 git 的概念与操作。
… , because if you understand what Git is and the fundamentals of how it works, then using Git effectively will probably be much easier for you. —— Pro Git
什么是 Git
使用 snapshot 而非 Δ
git 和其他 VCS (Version Control System)最大的区别就在于它们是如何对待 (think of)数据的。
绝大部分的 VCS 存储的文件以及不同版本间对这些文件进行的修改 (delta-based version control)。Store data as a series of changesets。
相较之下,git 认为数据是一个微型文件系统中的一系列快照 (snapshot)。Store data as a series of snapshots.
Git thinks about its data more like a stream of snapshots.
commit 与 snapshot
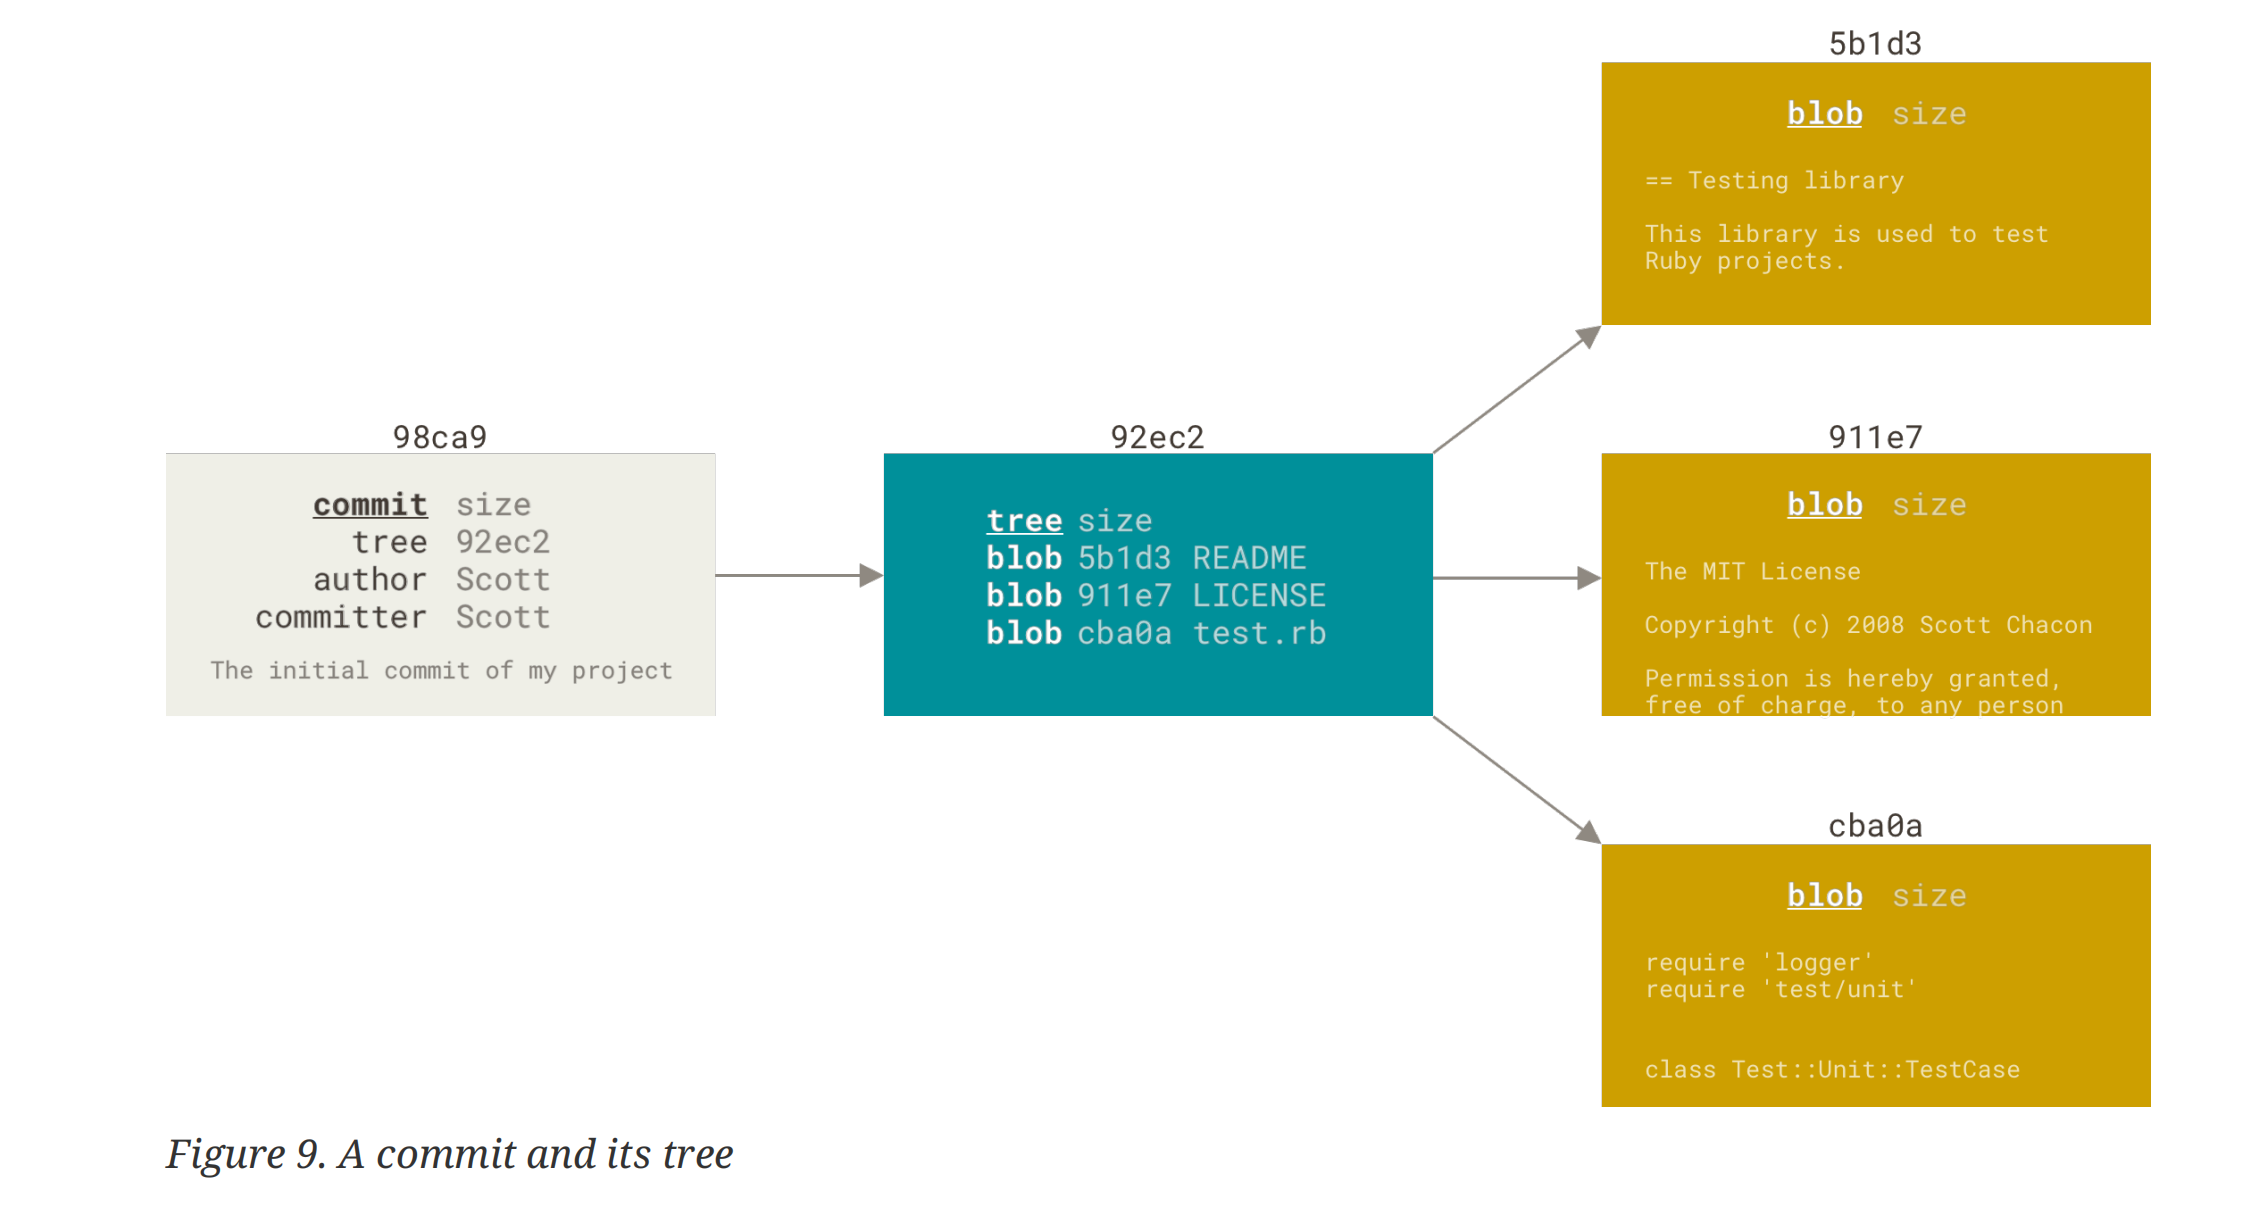
When you make a commit, Git stores a commit object that contains a pointer to the snapshot of the content you staged. This object also contains the author’s name and email address, the message that you typed, and pointers to the commit or commits that directly came before this commit (its parent or parents): zero parents for the initial commit, one parent for a normal commit, and multiple parents for a commit that results from a merge of two or more branches.
snapshot 是一种当前项目状态的一种抽象,实际上我们的 fies 以树的形式 (tree object)存储在 repo 中。我们提交到 repo 中的 commit 包含一些元数据 ([[#^ce9b5c|meta data]])以及一个指向树的根节点的指针。
Staging the files computes a checksum for each one, stores that version of the file in the Git repository (Git refers to them as blobs), and adds that checksum to the staging area.
When you create the commit by running git commit, Git checksums each subdirectory and stores them as a tree object in the Git repository. Git then creates a commit object that has the metadata and a pointer to the root project tree so it can re-create that snapshot when needed.
Git 的数据完整性
所有记录在 git 中的数据都会使用哈希算法 (SHA-1)进行检验和处理,然后才根据哈希值将数据记录在 git 中,这也意味着不可能在不被 git 记录的情况下修改其中的文件。–> integrity
You can’t lose information in transit or get file corruption without Git being able to detect it.
三种 git 追踪的文件状态(重要)
git 追踪 (tracking)的文件有三种状态:modified, staged and committed
- modified 意味着对文件做了修改但是还没有 commit 到数据库 (local or remote)中
- staged 意味着标记已修改的文件并且可以 commit 其当前版本
- committed 指文件已经安全地存储在了本地数据库中

三种状态也对应着三个概念:working tree, staging area and Git repository - The working tree is a single checkout of one version of the project. These files are pulled out of the compressed database in the Git directory and placed on disk for you to use or modify.
- The staging area is a file, generally contained in your Git directory, that stores information about what will go into your next commit.
- The Git directory is where Git stores the metadata and object database for your project. This is the most important part of Git, and it is what is copied when you clone a repository from another computer. (ps: 文中所说的"metadata"可以理解为对数据的存放、访问、处理等操作的规则,可以联想 HTML 的<head>中的<meta> tag,以及类比于磁盘管理中的 MBR) ^ce9b5c
基于这三种状态,我们可以运行一条标准(常见)的工作流:
- 在当前的工作目录下修改文件
- 通过
add来选择性地将文件加入到暂存区中,准备提交 - 将暂存区的文件提交到本地仓库,并且永久地记录下它的快照(记住我们是通过 hash value 来对 snapshot 进行唯一标识的)
Git 基础
Tracked, Staged and Untracked
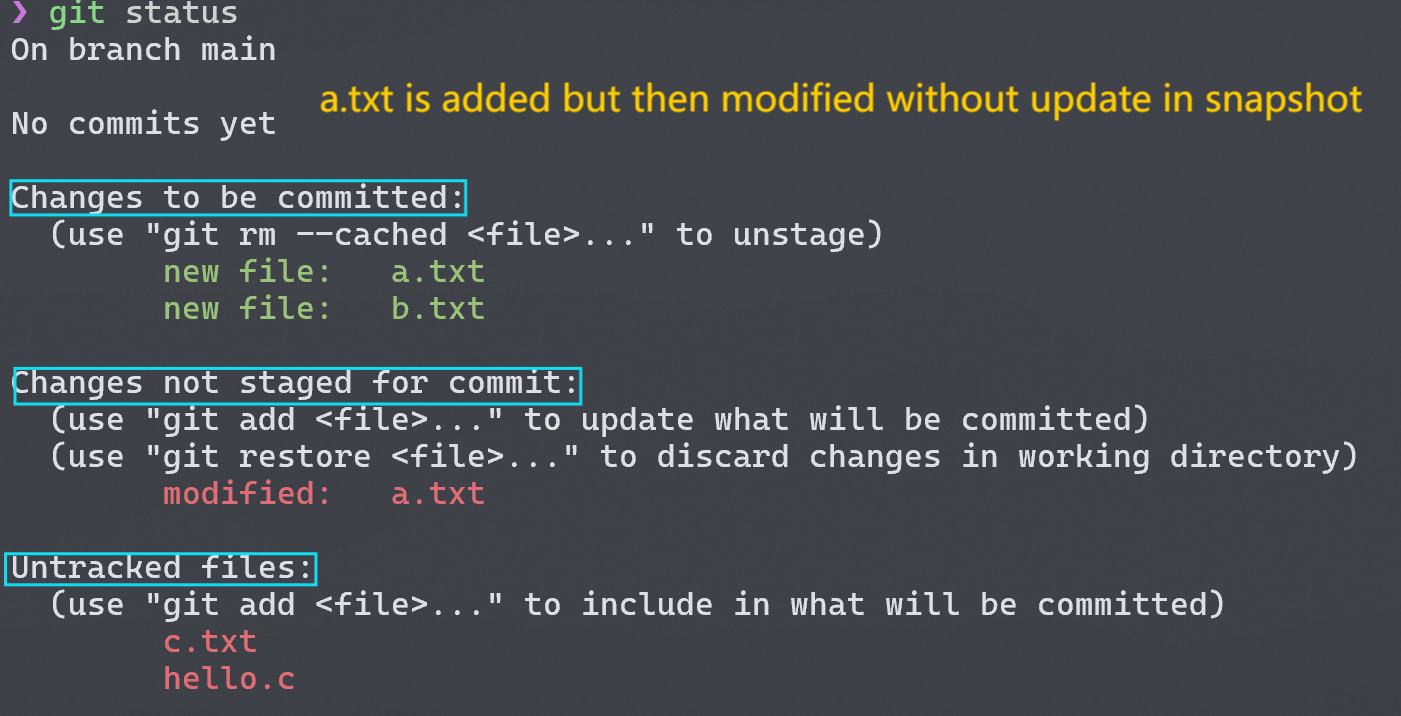
前面说“git 追踪的文件有三种状态”,其中追踪就是指 tracked,顾名思义 git 能够知道文件是否做了更改 (changes)。实际上,git 目录下的文件只有两种状态,tracked or untracked。对于 untracked files 来说,我们通过git add来将它们推到暂存区中,此时的 snapshot 加入了此次变动,所以它们暂时也是 staged 状态(当然也是 tracked)。但是如果我们对它们进行修改,那么这些 tracked 文件的修改会被 git 追踪,但并没有将 changes 更新到 staging area 的 snapshot 中,所以此时我们 commit 的话将是把未更新的 snapshot 永久记录在 git log 中。为了更新 snapshot 中的文件版本,我们在修改后还需要git add重新 staging。
Untracked basically means that Git sees a file you didn’t have in the previous snapshot (commit), and which hasn’t yet been staged.
git addis a multipurpose command — you use it to begin tracking new files, to stage files, and to do other things like marking merge-conflicted files as resolved. It may be helpful to think of it more as “add precisely this content to the next commit” rather than “add this file to the project”.
Ignoring Files
有时候我们的工作目录中会有一些我们不想提交的文件,例如编译中间过程产生的.o文件、日志等,而它们又总是会出现在Untracked files下,为了让 git 忽略它们,我们可以创建一个.gitignore隐藏文件。.gitignore中写的是你需要忽略的文件名,当然可以使用通配符 (glob pattern)的形式。下面是一个例子:
1 | cat .gitignore |
git diff
you’ll probably use it most often to answer these two questions: What have you changed but not yet staged? And what have you staged that you are about to commit?
不同于git status只给出哪些文件做了修改,git diff能更详细地给出文件中增加或删除的文本行,这些是做了修改但是含没有暂存的文件。我们知道,git diff比较的是工作目录下的文件和暂存区中的文件,所以记得要在修改后要更新 snapshot,才会更新文件的 version。

1 | git diff --staged |
加上 option--staged则会比较暂存区文件和上一次 commit 的区别,注意看hello.cc文件的版本是还没有更新的,还是暂存区中的旧版本。
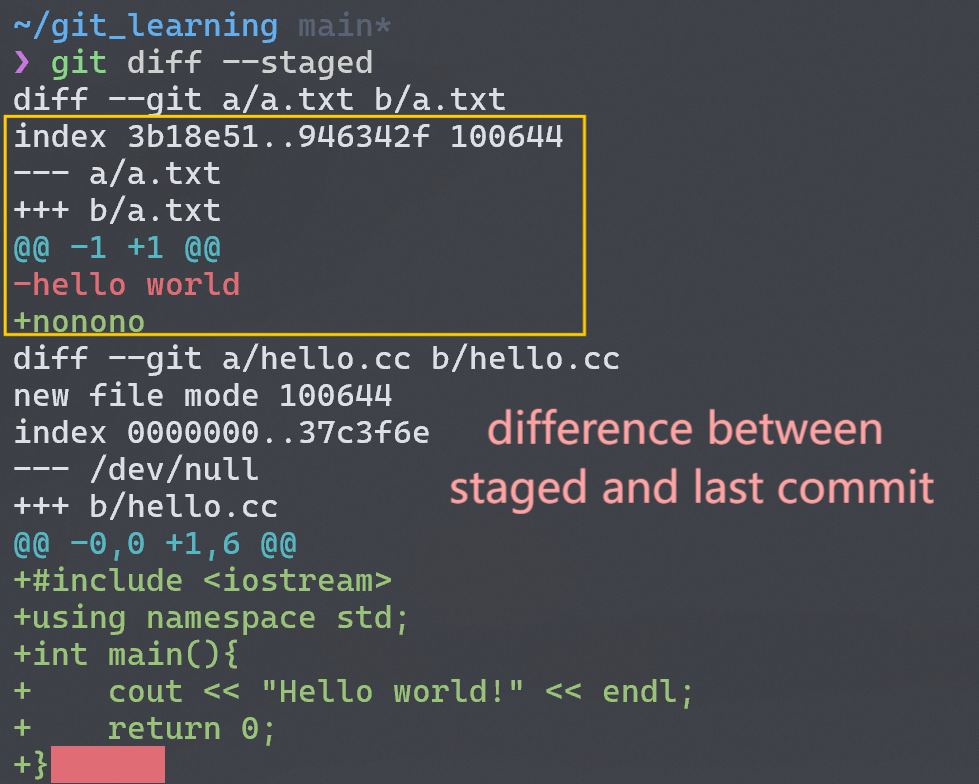
要注意,git diff这个命令本身只比较修改后的 unstaged 文件和 staged 文件间的区别,而不会显示它们与上一次 commit 的区别!
git rm
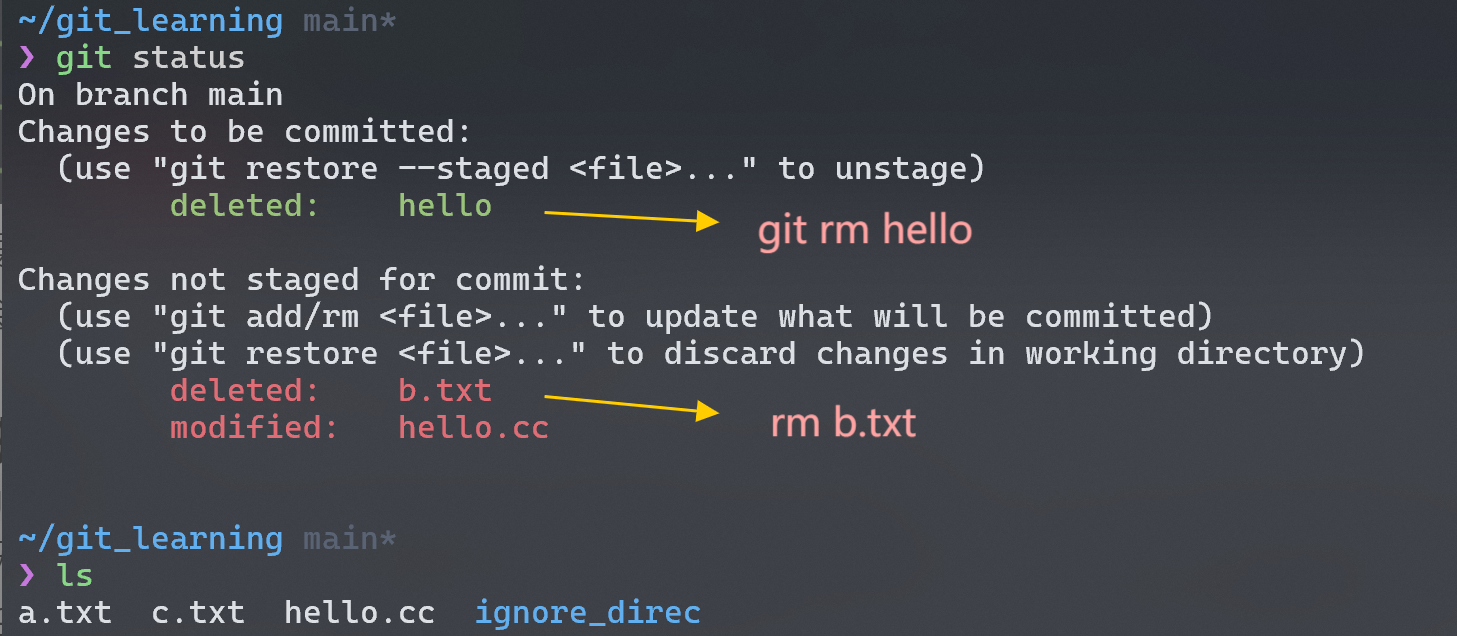
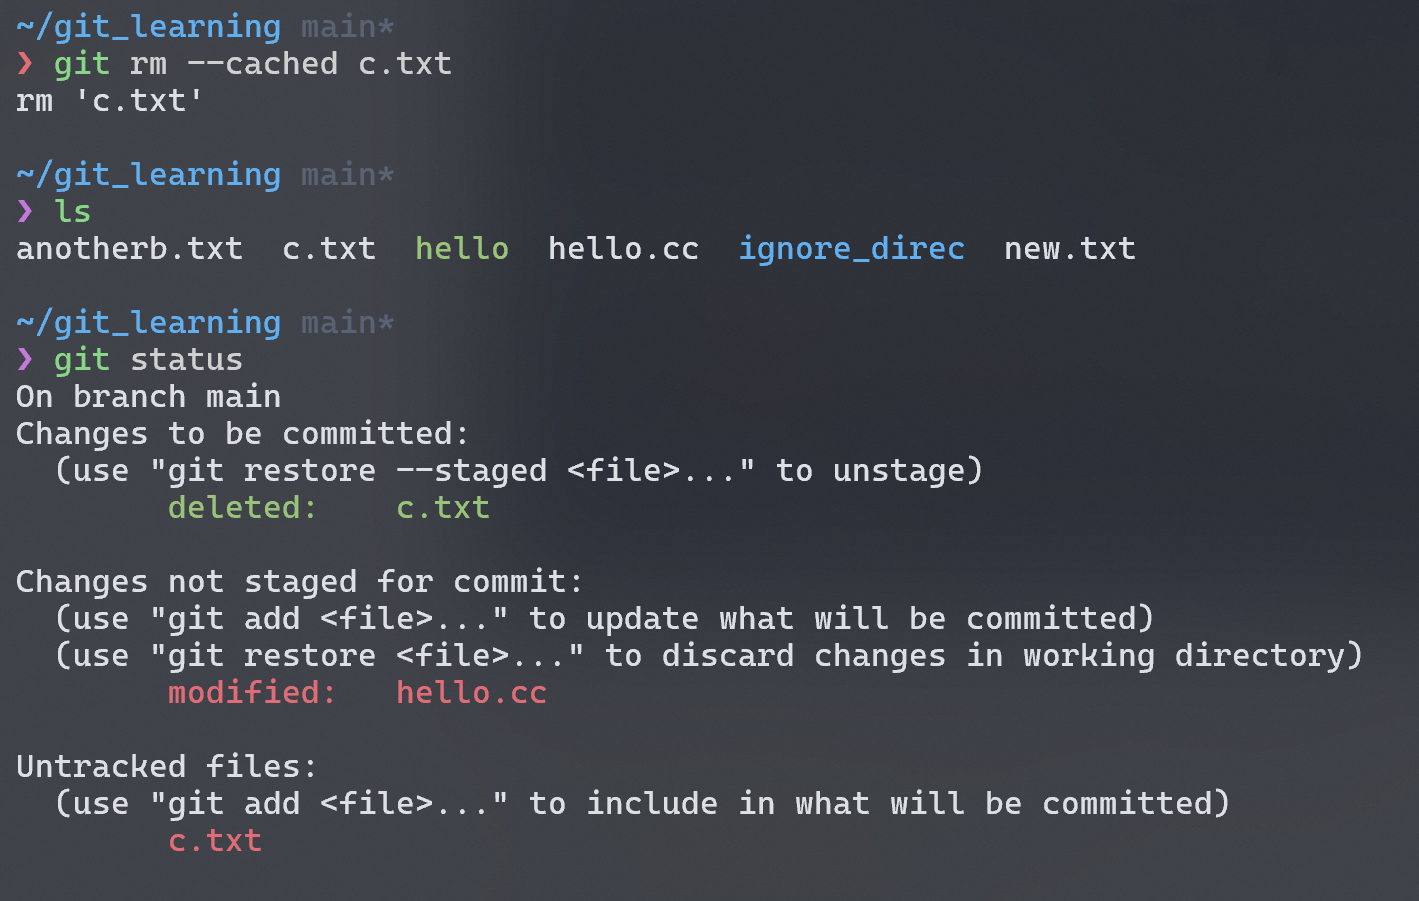
git rm将文件从 working directory 中删除,同时 stage changes。在下图的情况中,如果我们此时 commit,那么 history 中的 snapshot 将不再有hello文件,但是b.txt还是存在的,因为 git 并没有记录该文件的改变 (deletion)。
You can pass files, directories, and file-glob patterns to the
git rmcommand.
既然git add可以使文件 untracked --> tracked,当我们不小心 add 了不希望提交的文件,我们也可以将其从 tracked 状态转变为 untracked 状态:
1 | git rm --cached filename |
Undoing Things
1. 修订上次的提交
如果我们在 commit 后发现有些更改忘记 stage 了,可以加上 option--amend来修正
1 | git commit -m "my first commit" |
2. 将 staged 转为 unstaged
我们可能通过git add *不小心暂存了我们不想在下次 commit 的文件,为了将其从暂存区中解救出来,需要下面的命令(其实这在 header 中有写):
1 | showed in status bar, better √ |
注意它和上文提到的解除追踪状态 tracked --> untracked 之间的区别!
3. 撤销对文件的修改
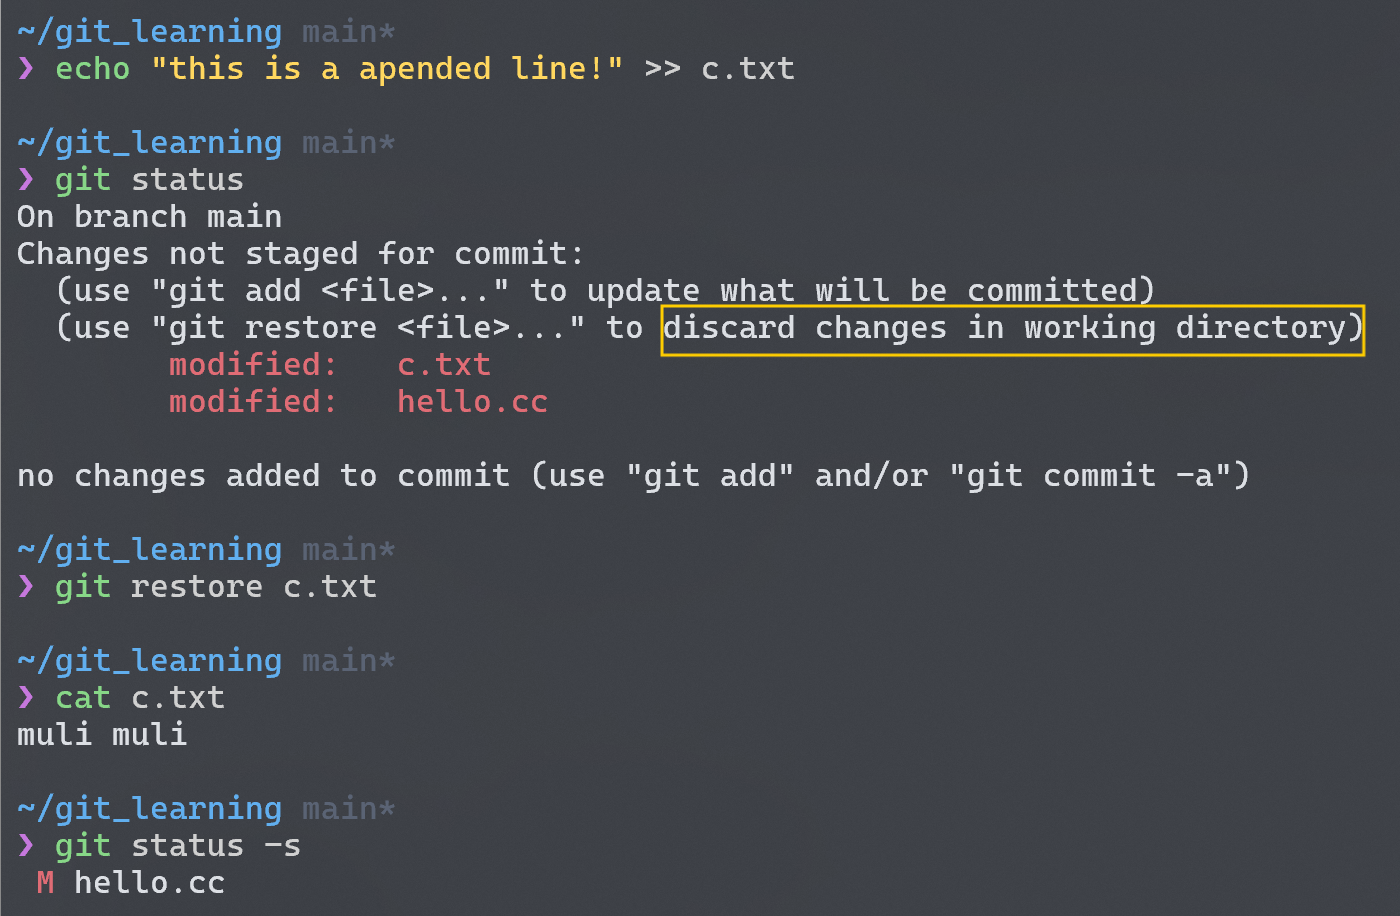
如果要对做了修改的文件进行回退 (unmodify),可以git restore,当然这也是在 header 中有提示的。
不过这个命令还是要慎重使用
It’s important to understand that
git restore filenameis a dangerous command. Any local changes you made to that file are gone — Git just replaced that file with the last staged or committed version.
1 | git restore filename |
如果想要保存修改,同时又想让其不显示在 status 中,在 Pro Git, go over stashing and branching 一节中有讲,由于不是很重要,故不在此赘述。
Remember, anything that is committed in Git can almost always be recovered. Even commits that were on branches that were deleted or commits that were overwritten with an
--amendcommit can be recovered. However, anything you lose that was never committed is likely never to be seen again.
4.回退历史
讨论了这么多,我们终于迎来了版本控制系统的一个重要的特性:回退 (rewind/roll back/revoke)。在 git 中常用的有两种方式将我们的 working tree 回退到之前的 snapshot 中,分别是reset和revert。
1 | the commmit's checksum you want to roll back |
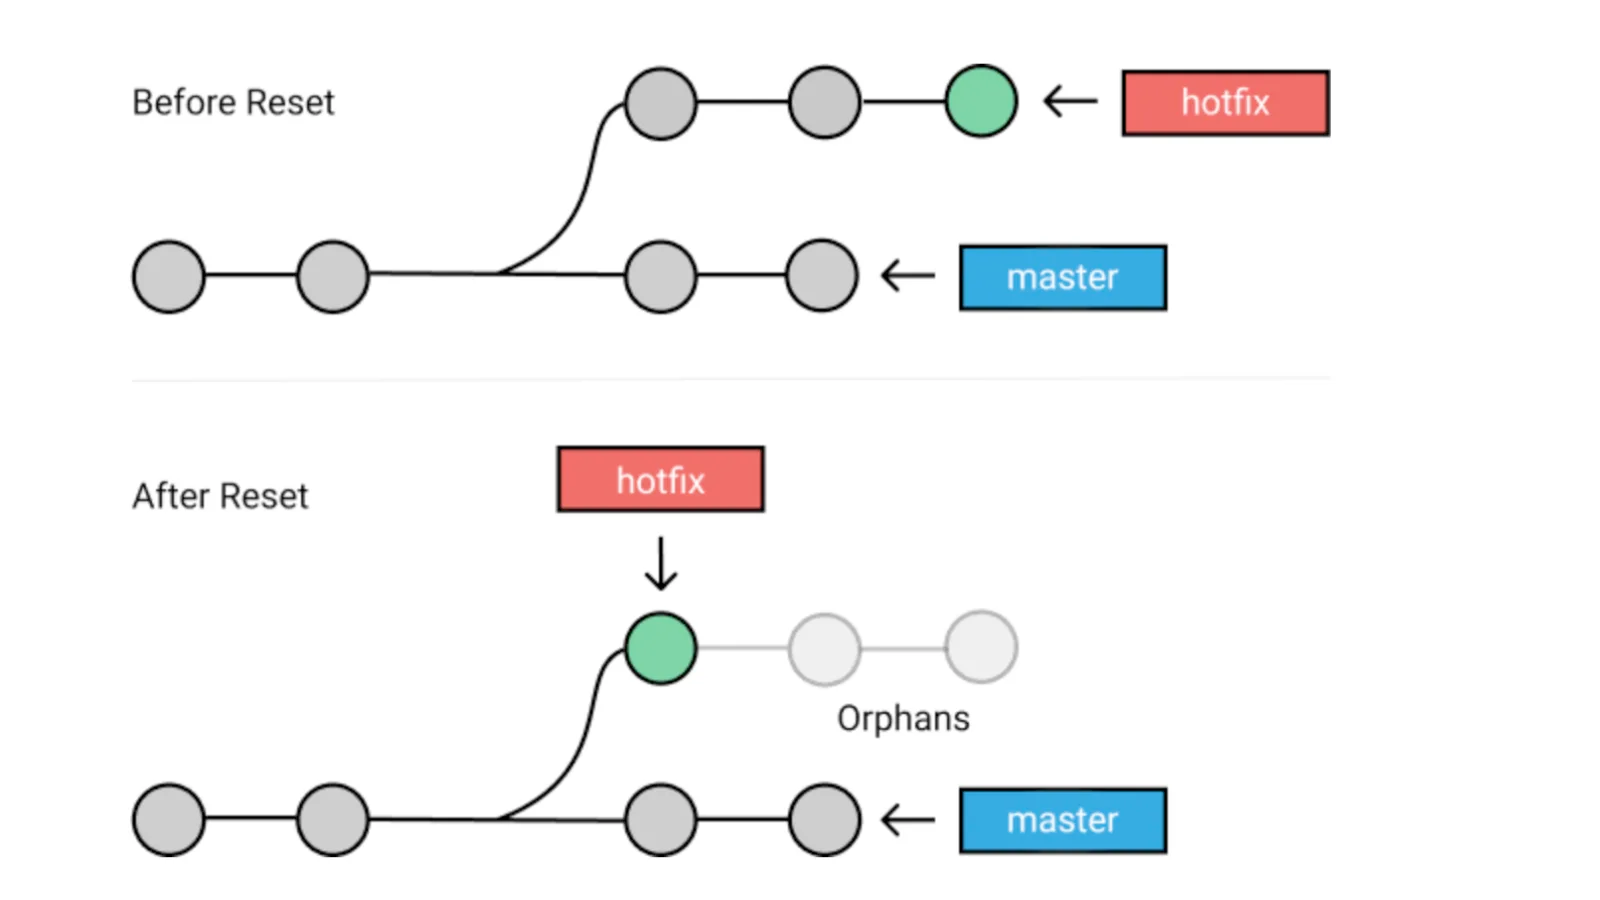
reset实际通过三步来完成回退(具体可看 Sec 7.7 Git Tools - Reset Demystified),结果是它将完全舍弃 (discard)回退目标点后的所有 commits,同时根据 snapshot 恢复工作目录和HEAD。
1 | ID is |
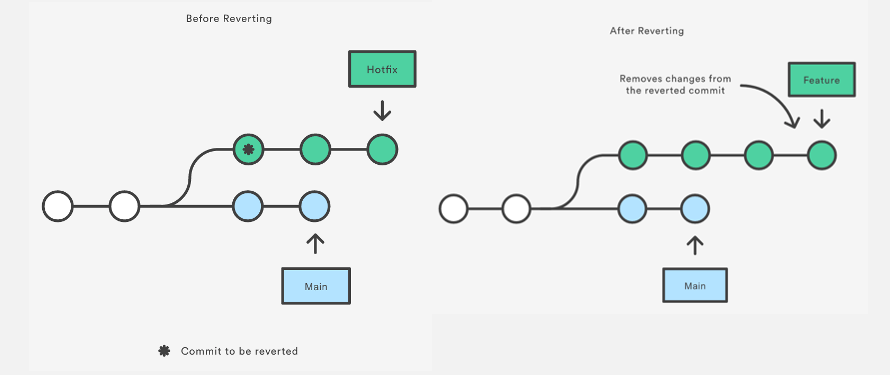
同样是回退,但是revert是重置某个特定提交之前对文件所做的所有修改,并且以一个新的 commit 提交到历史中。需要注意的是,revert是恢复指定 commit 之前的状态,而reset是恢复为指定 commit 的状态,略有不同。
为了安全起见,在撤销有其他开发者工作的 repo 中的修改时,请使用 git revert。
Working with Remotes
除了在本地的 repo 上工作外,我们还可能需要用到远端仓库来和其他人协作,或者单纯作为本地库的一个备份。一个本地仓库可以联系不同的远端仓库,比如可以选择 Github 托管一个 repo,用 Gitee 托管另一个。
Remote repositories are versions of your project that are hosted on the Internet or network somewhere. You can have several of them, each of which generally is either read-only or read/write for you.
The word “remote” does not necessarily imply that the repository is somewhere else on the network or Internet, only that it is elsewhere.
1. 关于 git clone
我们 clone 的仓库是会自己默认联系原本的远端仓库的,所以说我们在刚克隆的仓库下git remote -v查看远端仓库信息时会发现已有origin (或其他 shortname)。我觉得这是因为 commit 到远端仓库的数据是本地仓库的“全部”,所以也会带上 clone 的仓库的信息。
… the
git clonecommand implicitly adds the origin remote for you.
2. Adding, Renaming and Removing
操作如下:
1 | add a remote |
关于 rename:It’s worth mentioning that this changes all your remote-tracking branch names, too.
关于 remove:Once you delete the reference to a remote this way, all remote-tracking branches and configuration settings associated with that remote are also deleted.
Tagging
git 能让我们为某些提交打上 tag,以此表明这些提交很重要,例如标记新版本的发布 (v1.0, v2.0)。
1 | lightweighting tag |
如果我们要为之前的 commit 打上标签,需要指出需要 tag 的提交的 checksum,否则就默认为最近的一次提交打 tag。

By default, the git push command doesn’t transfer tags to remote servers. You will have to explicitly push tags to a shared server after you have created them. You can run
git push origin <tagname>.
Git 分支
… , we’ll cover Git’s killer feature: its branching model, and it certainly sets Git apart in the VCS community.
在许多 VCS 中要实现分支需要复制一个完整的源代码目录 (source code directory),在此之上才能进行分支的开发。对于大的工程项目来说,分支无疑会产生巨大的开销。对比之下,git 的 branching model 轻量高效,这也是为什么称之为 “killer feature”。
The way Git branches is incredibly lightweight, making branching operations nearly instantaneous, and switching back and forth between branches generally just as fast.
回顾一下我们对 commit 和 snapshot 的讨论,如果我们有许多 commits,那么它们在一个分支上将形成一个链表(头插入)。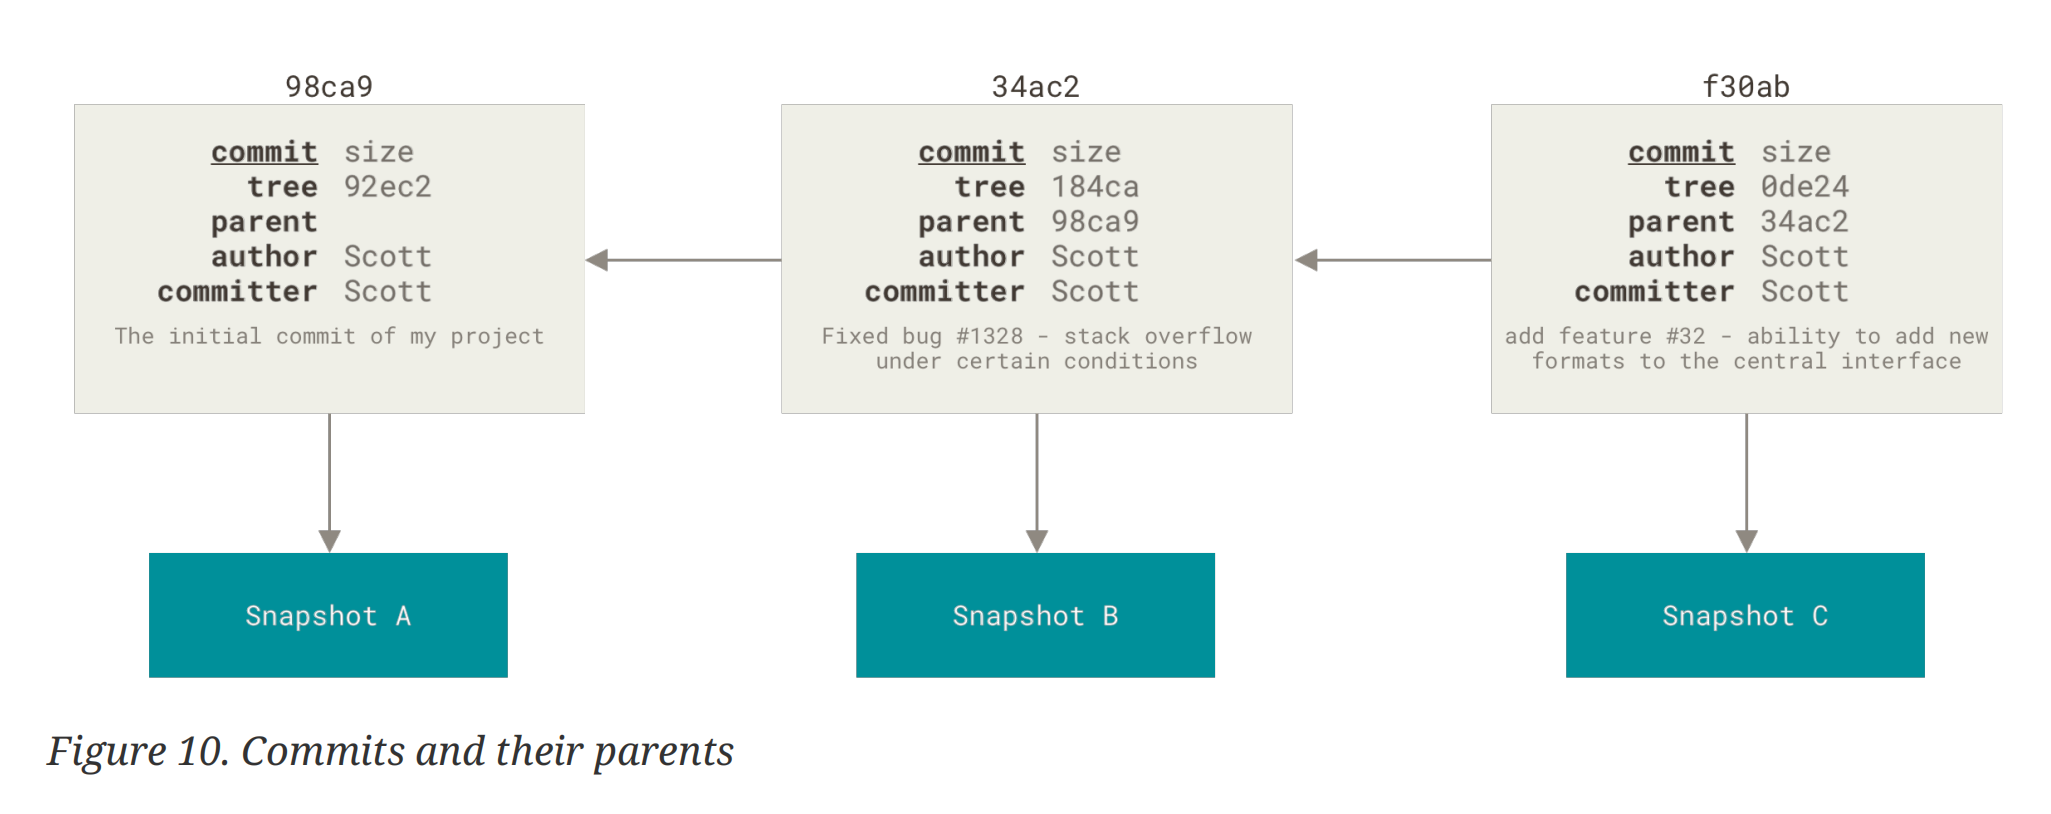
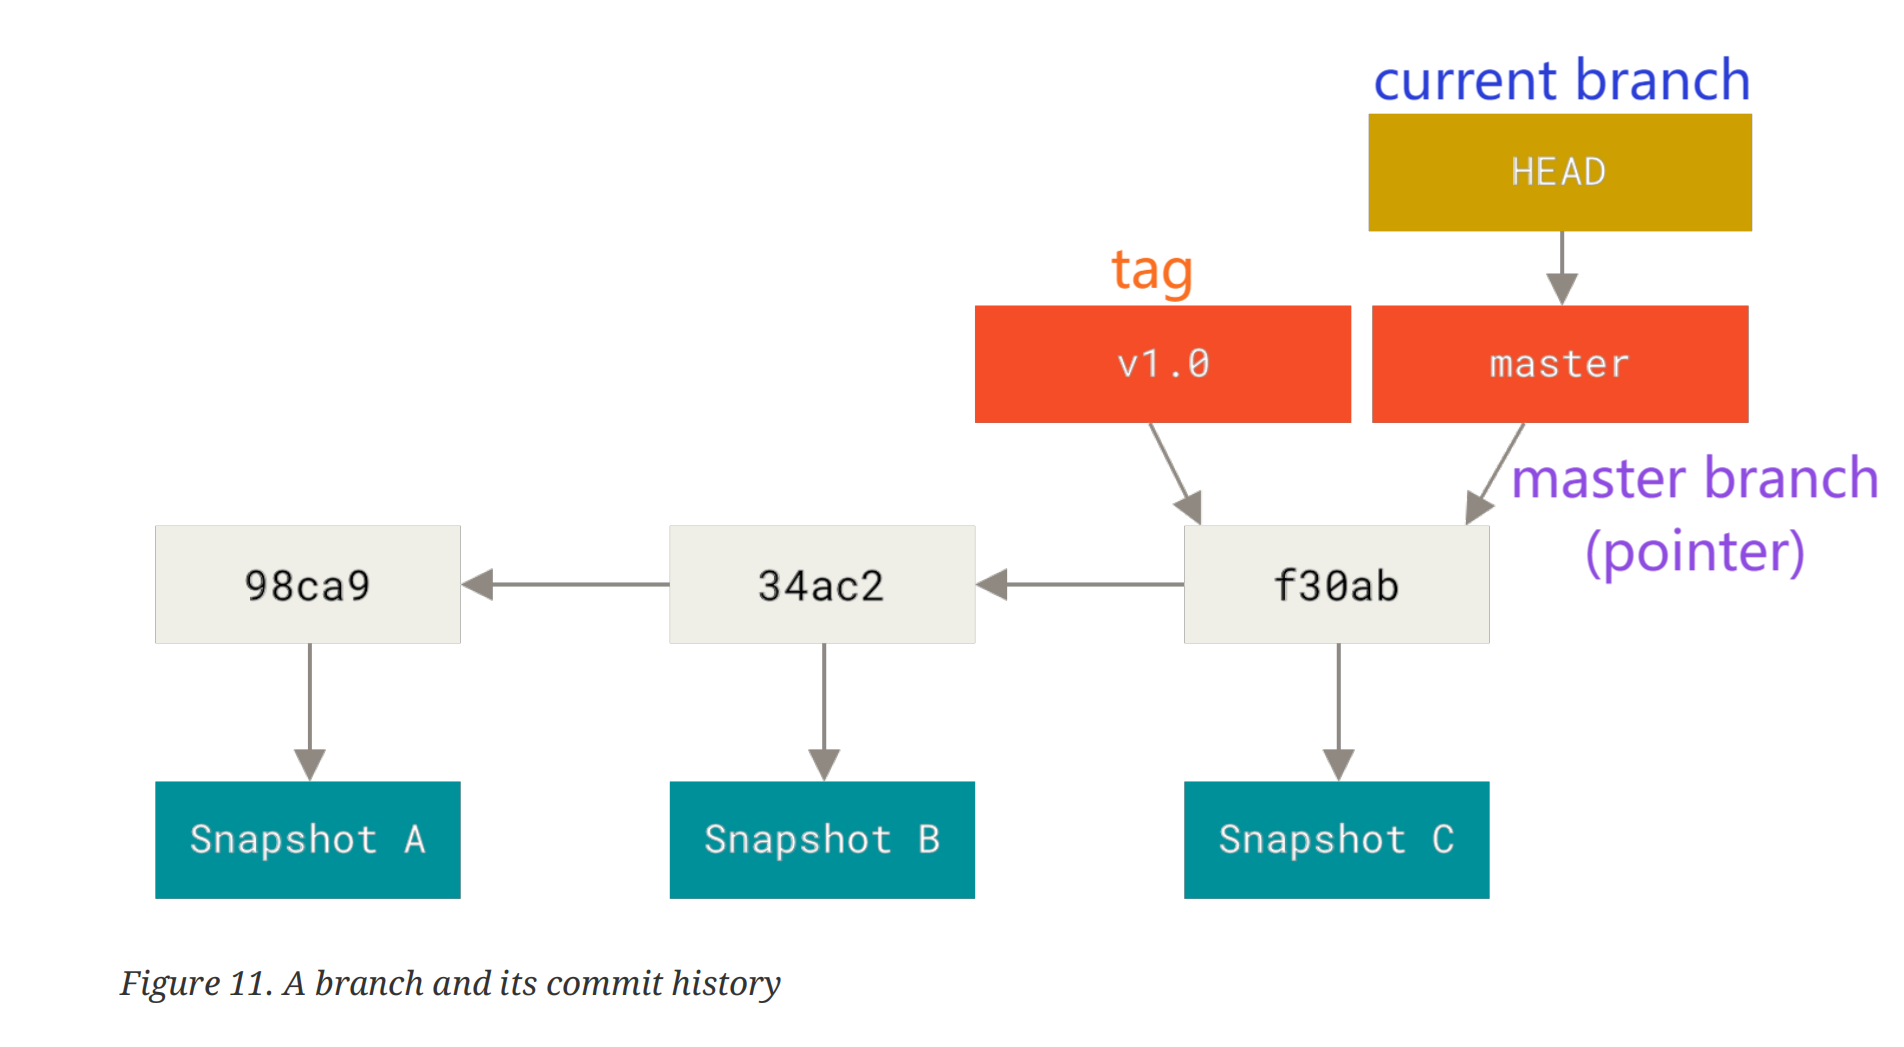
git 上的一个分支只是一个轻量的指针,这也意味这它可以随便移动指向任意的 commit。当我们提交一个 commit 时,branch 指针就会向前移动,指向最新的那个 commit。下图中HEAD指针指示着我们当前所处的分支为master。
Creating and Switching branches
1 | just create a new branch |
我们创建的分支基于HEAD指针指向的当前分支(也是指针)指向的 commit(看起来有点绕),而且创建完成后并不会自动切换到新分支。
1 | git checkout <branch> |
通过git checkout,我们的HEAD指针会指向切换的分支,假设是我基于main分支的最新 commit 创建的diverge分支。我们可以在这个新分支上提交 commit,而原来的main仍然指向开始 diverge 的那个 commit,不会收到新分支的影响。当使用git log查看 commit 历史时,我们发现默认只会显示这个分支的所有提交。
- To show commit history for the desired branch you have to explicitly specify it:
git log <branch>. - To show all of the branches, add
--allto your git log command.
如果此时我们再checkout回原来的分支main,那么当前工作目录下的文件会恢复 (revert)为切换分支指向的 snapshot。
It essentially rewinds the work you’ve done in your
divergebranch so you can go in a different direction.However, before you do that, note that if your working directory or staging area has uncommitted changes that conflict with the branch you’re checking out, Git won’t let you switch branches. It’s best to have a clean working state when you switch branches.
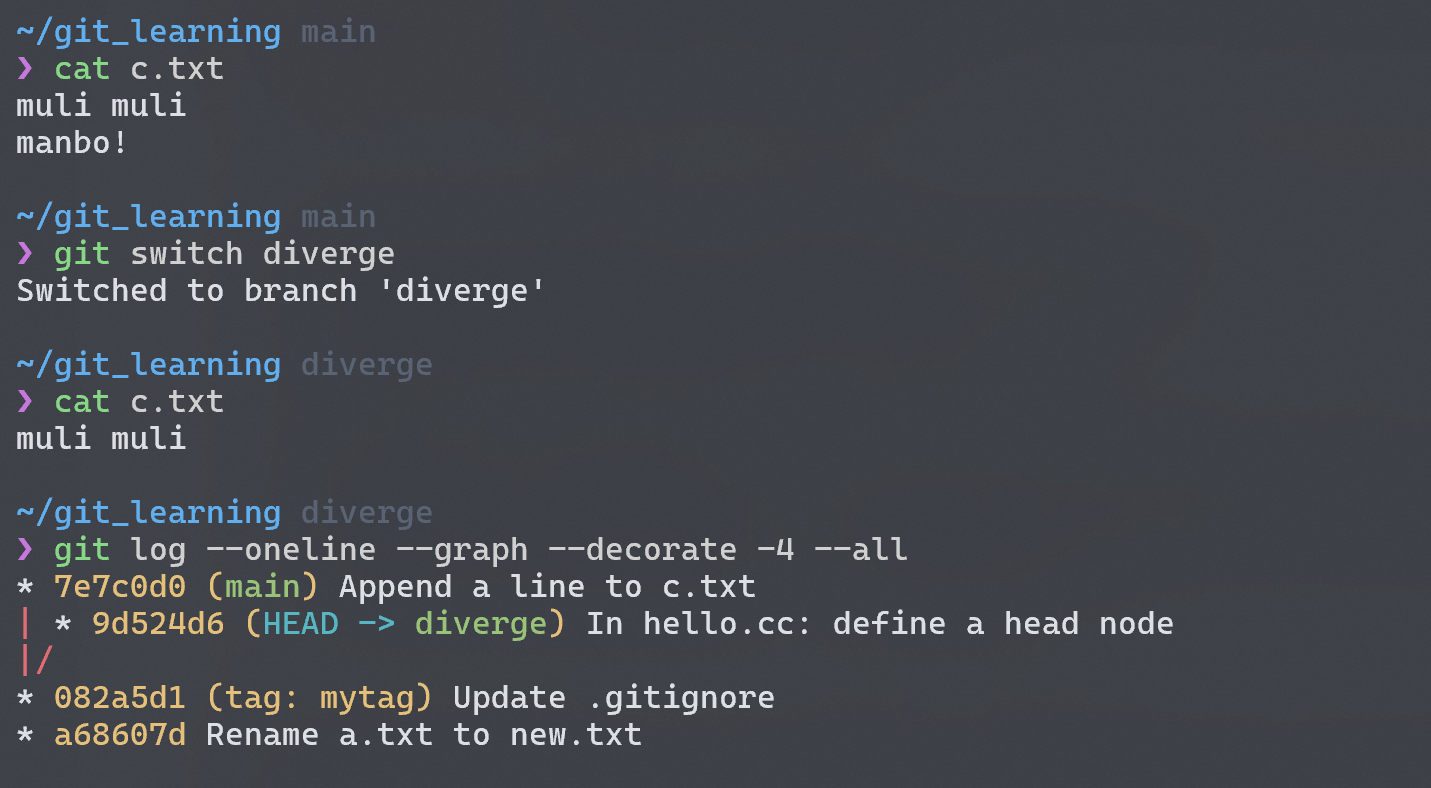
Basic Branching and Merging
上面的图显示我在main分支上对c.txt做了修改和 commits,同时在diverge分支上又有对hello.cc做了修改和另一些 commits。此时如果我在diverge分支上的工作已经完成了,想要将diverge合并到main中,需要先切换到main分支,再通过git merge来将目标分支合并到当前分支。
git 使用 three-way merge的方法来实现两个分支的合并(有端联想 three-way handshake)。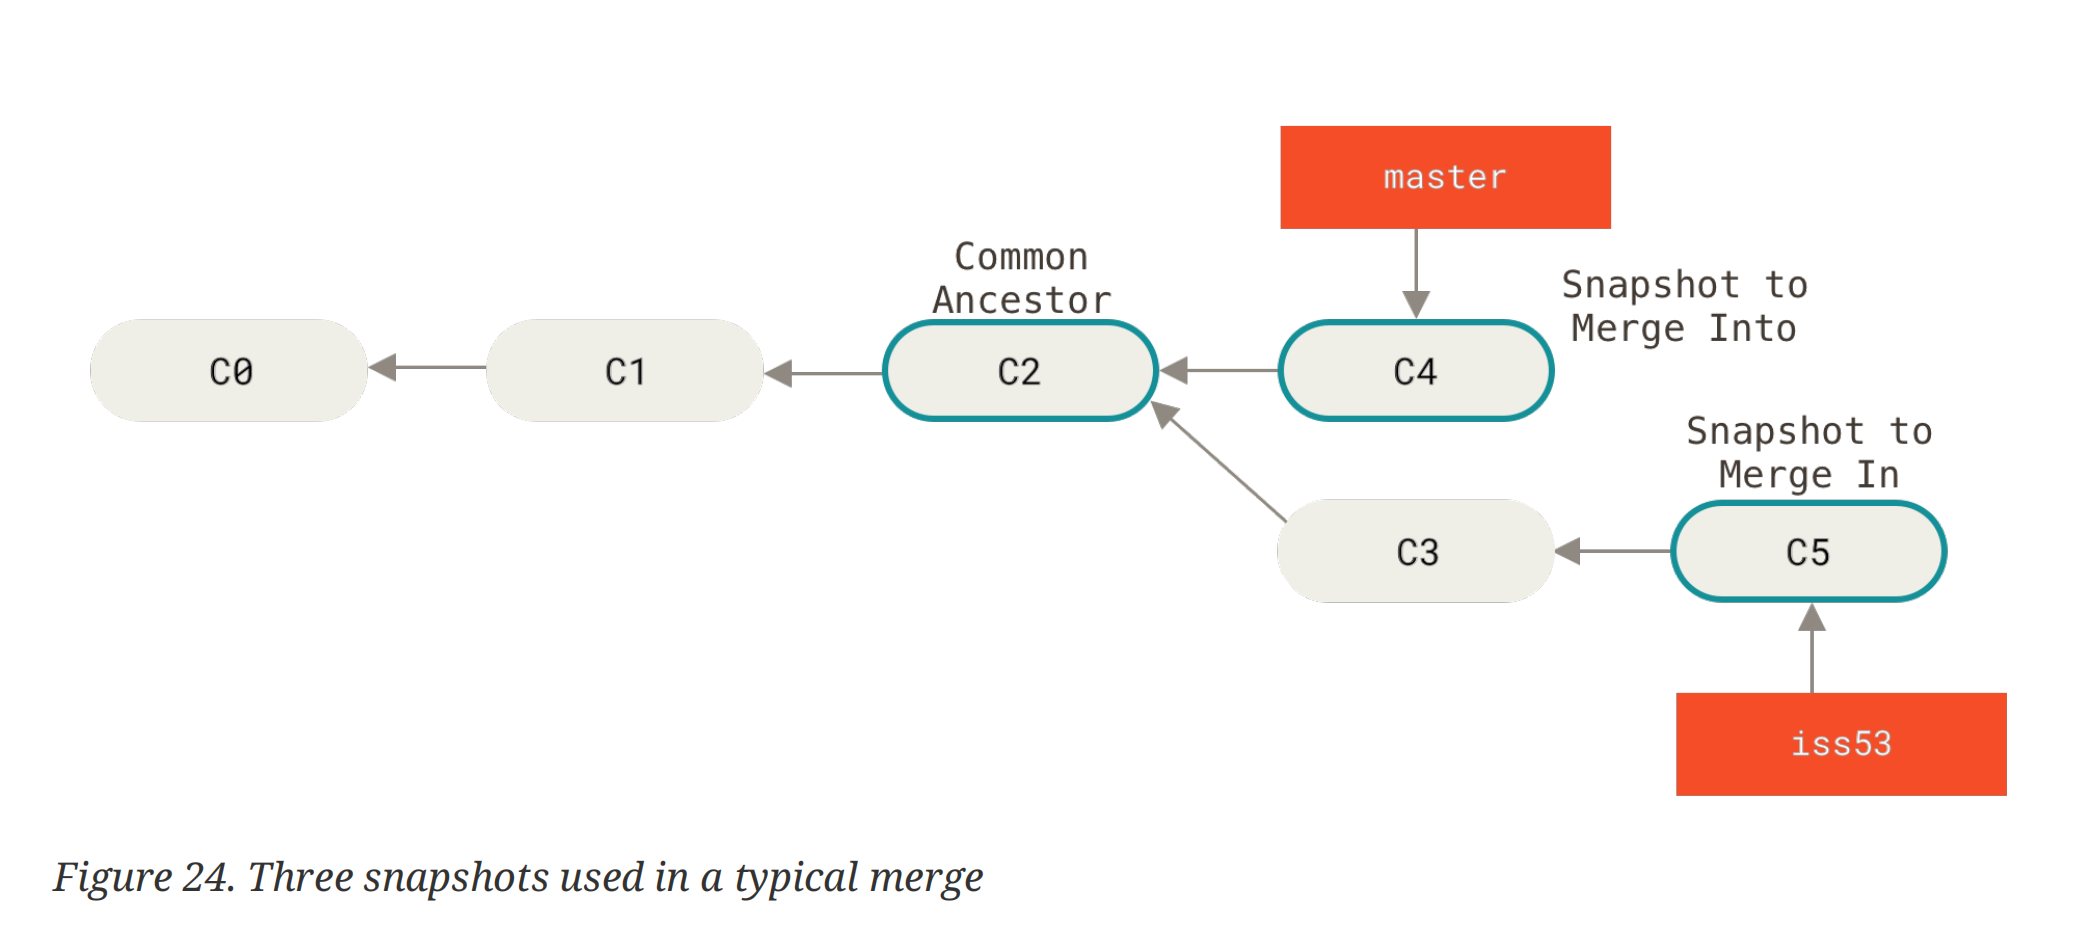
所谓的 tree-way 就是 git 用两个分支指向的 snapshot + 开始 diverge 的节点的 snapshot,一共三个 snapshots,来创建一个新的 snapshot,并且在merge commit提交到 repo 中。可以注意到,这个特殊的 commit 具有两个 parent commits。如果我们不需要再在 merge 完的分支上继续开发,就可以branch -d把分支删了。历史拓扑图如下: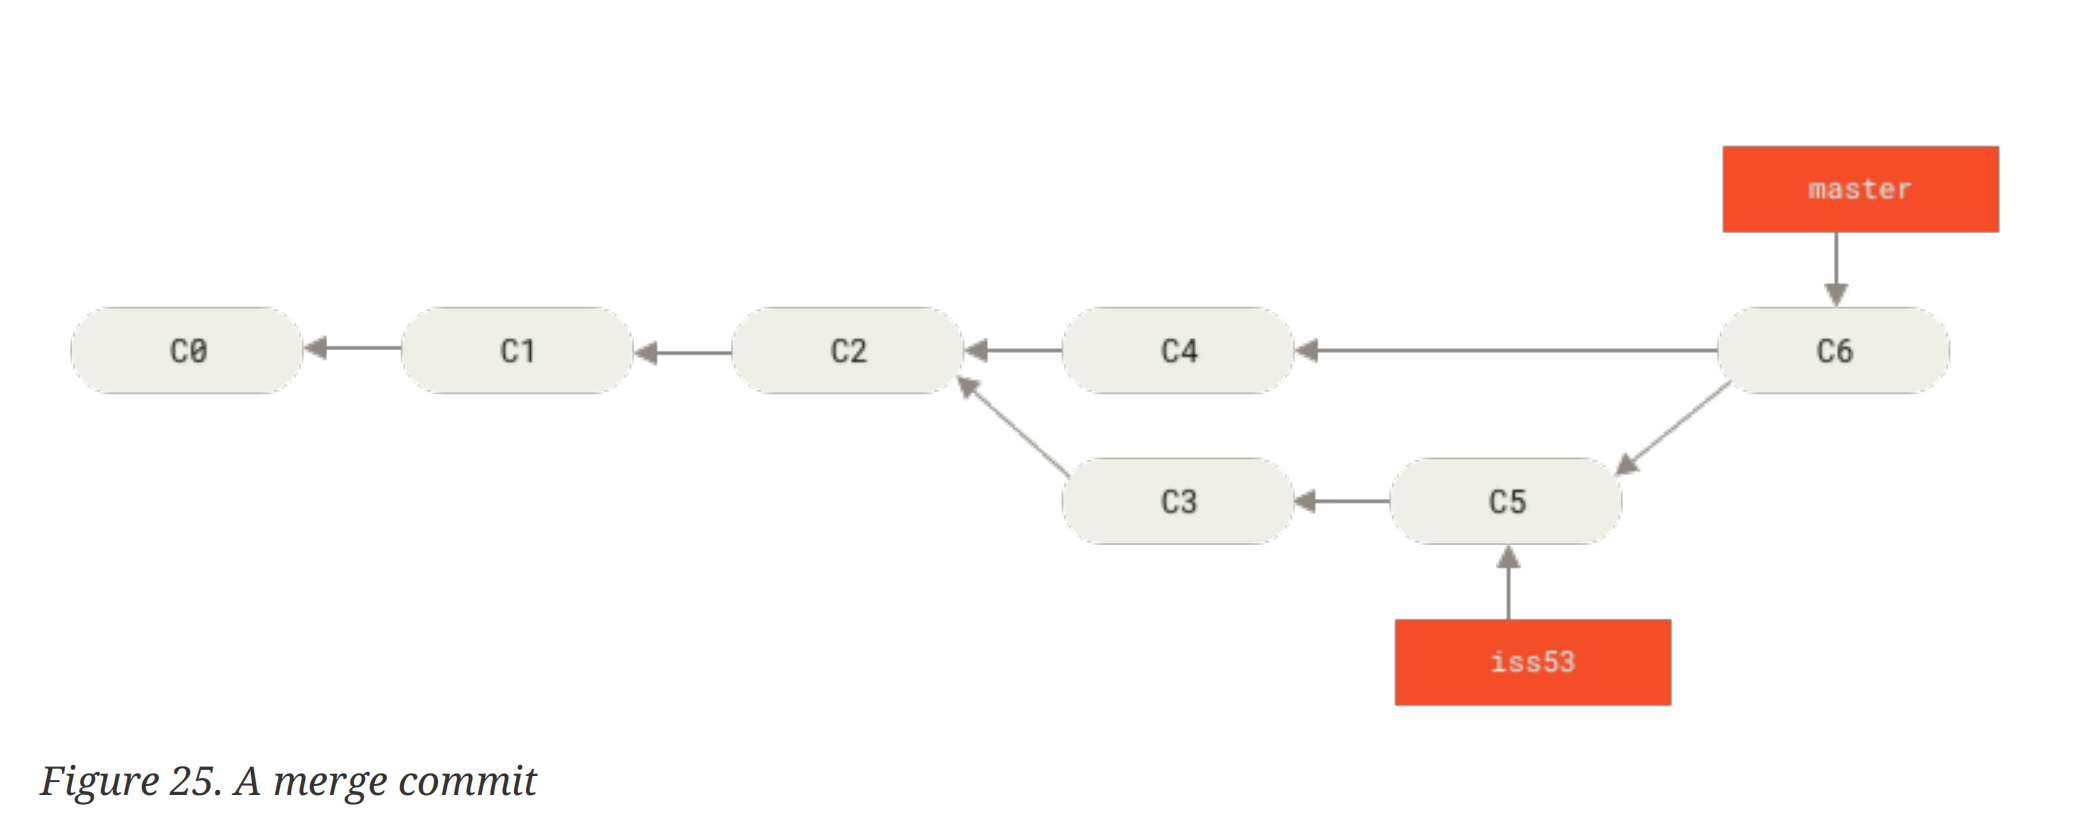 ^7f3018
Merge Conflict
合并冲突是一件挺头疼的事情,如果工程庞大起来,merge 需要解决的冲突就会变得很多。那么上面实操时为什么没有产生 merge confict 呢?因为两个分支修改的是不同的文件,我们以 common ancestor 的 snapshot 为基准来看两个分支的改动,不就相当于我在同一分支上对不同文件做了修改吗,所以不存在“冲突”。
If you changed the same part of the same file differently in the two branches you’re merging, Git won’t be able to merge them cleanly。
如果两个分支对同一个文件的同一位置做了修改,git 不知道以哪一分支的修改作为最终版本,所以会报错: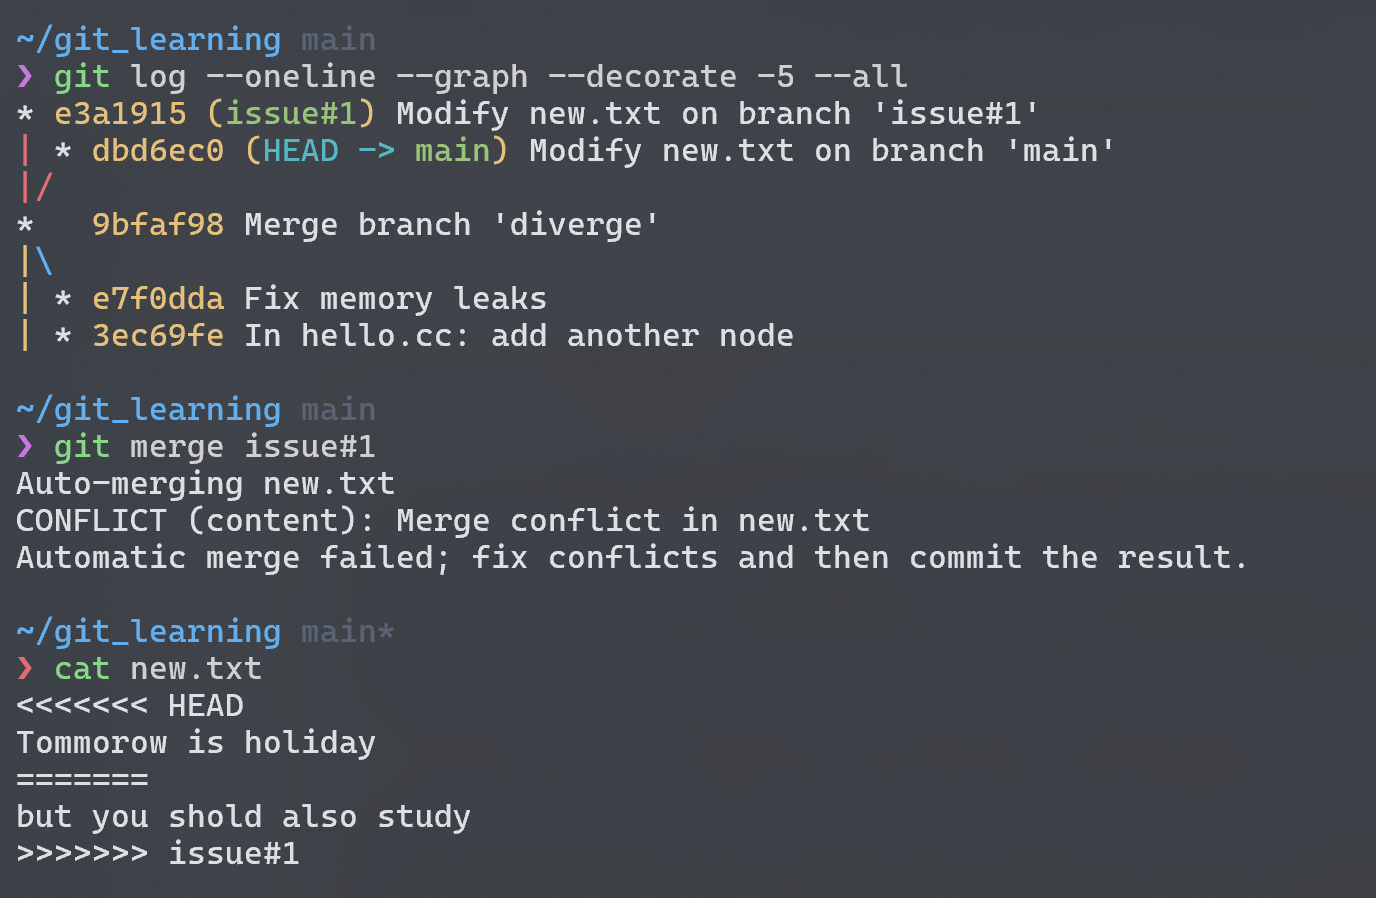
针对冲突的部分一个个 fix,全部解决后再次提交,完美解决冲突 😄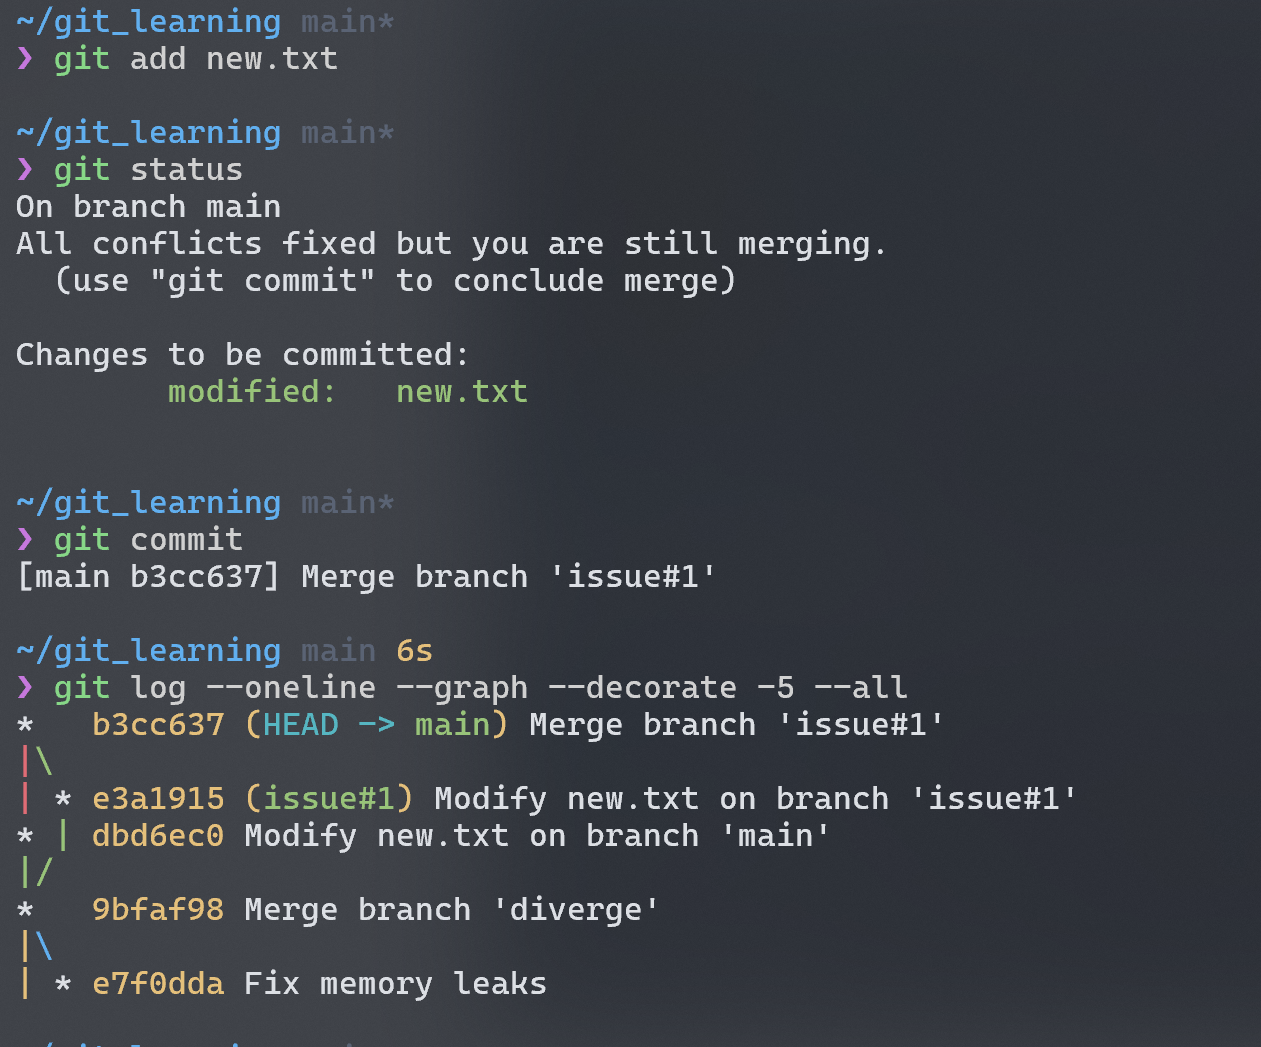
Branch Management
查看当前仓库的分支:
1 | git branch |
Option:
--all: 查看本地和远端的所有分支--mergedand--no-merged: 前者列举当前分支所合并了的分支,后者则列举当前分支还没有合并的分支,要指定特定分支可以在最后加上分支名<branch>
修改分支名称:
1 | git branch --move <branch> <newName> |
git 的修改分支操作和 Linux 修改文件名一样都是通过move。这里需要注意的是,我们此时修改的只是本地的分支名,还需要同步到远端。
1 | git push --set-upstream origin <newName> |
同步完成后我们再通过查看所有分支,会发现远端增加了一个新的分支,但旧分支还存在,需要我们手动把它删了。ps: 这里我并不是很理解为什么会出现两个分支,正如前文所说,git 的分支仅是轻量化的指针(最新 commit 的 checksum),既然本地能直接修改名称,为什么远端就不能这么做呢?
1 | git push origin --delete <oldName> |
Changing the name of a branch like master/main/mainline/default will break the integrations, services, helper utilities and build/release scripts that your repository uses. Before you do this, make sure you consult with your collaborators. Also, make sure you do a thorough search through your repo and update any references to the old branch name in your code and scripts.
Remote Branches
我们知道分支和标签都是指针,或者说是引用 (reference),关于分支和标签等引用,本地和远端都会分别存储,这也是为什么前文在本地创建和删除 tag 或 branch 后需要通过push来和远端同步。其中本地分支和远端分支之间的联系称为 remote-tracking,在本地通过一个remote-tracking branch来标识最新一次和远端连接时的 branch 状态(Pro Git 中把其比喻为书签 bookmark,非常形象)。
Remote-tracking branches are references to the state of remote branches. They’re local references that you can’t move; Git moves them for you whenever you do any network communication, to make sure they accurately represent the state of the remote repository.
当我们 clone 一个远端仓库时,我们默认会生成main/master分支指向最新的 commit,同时我们本地也会保存一个分支origin/master来表示远端分支的状态。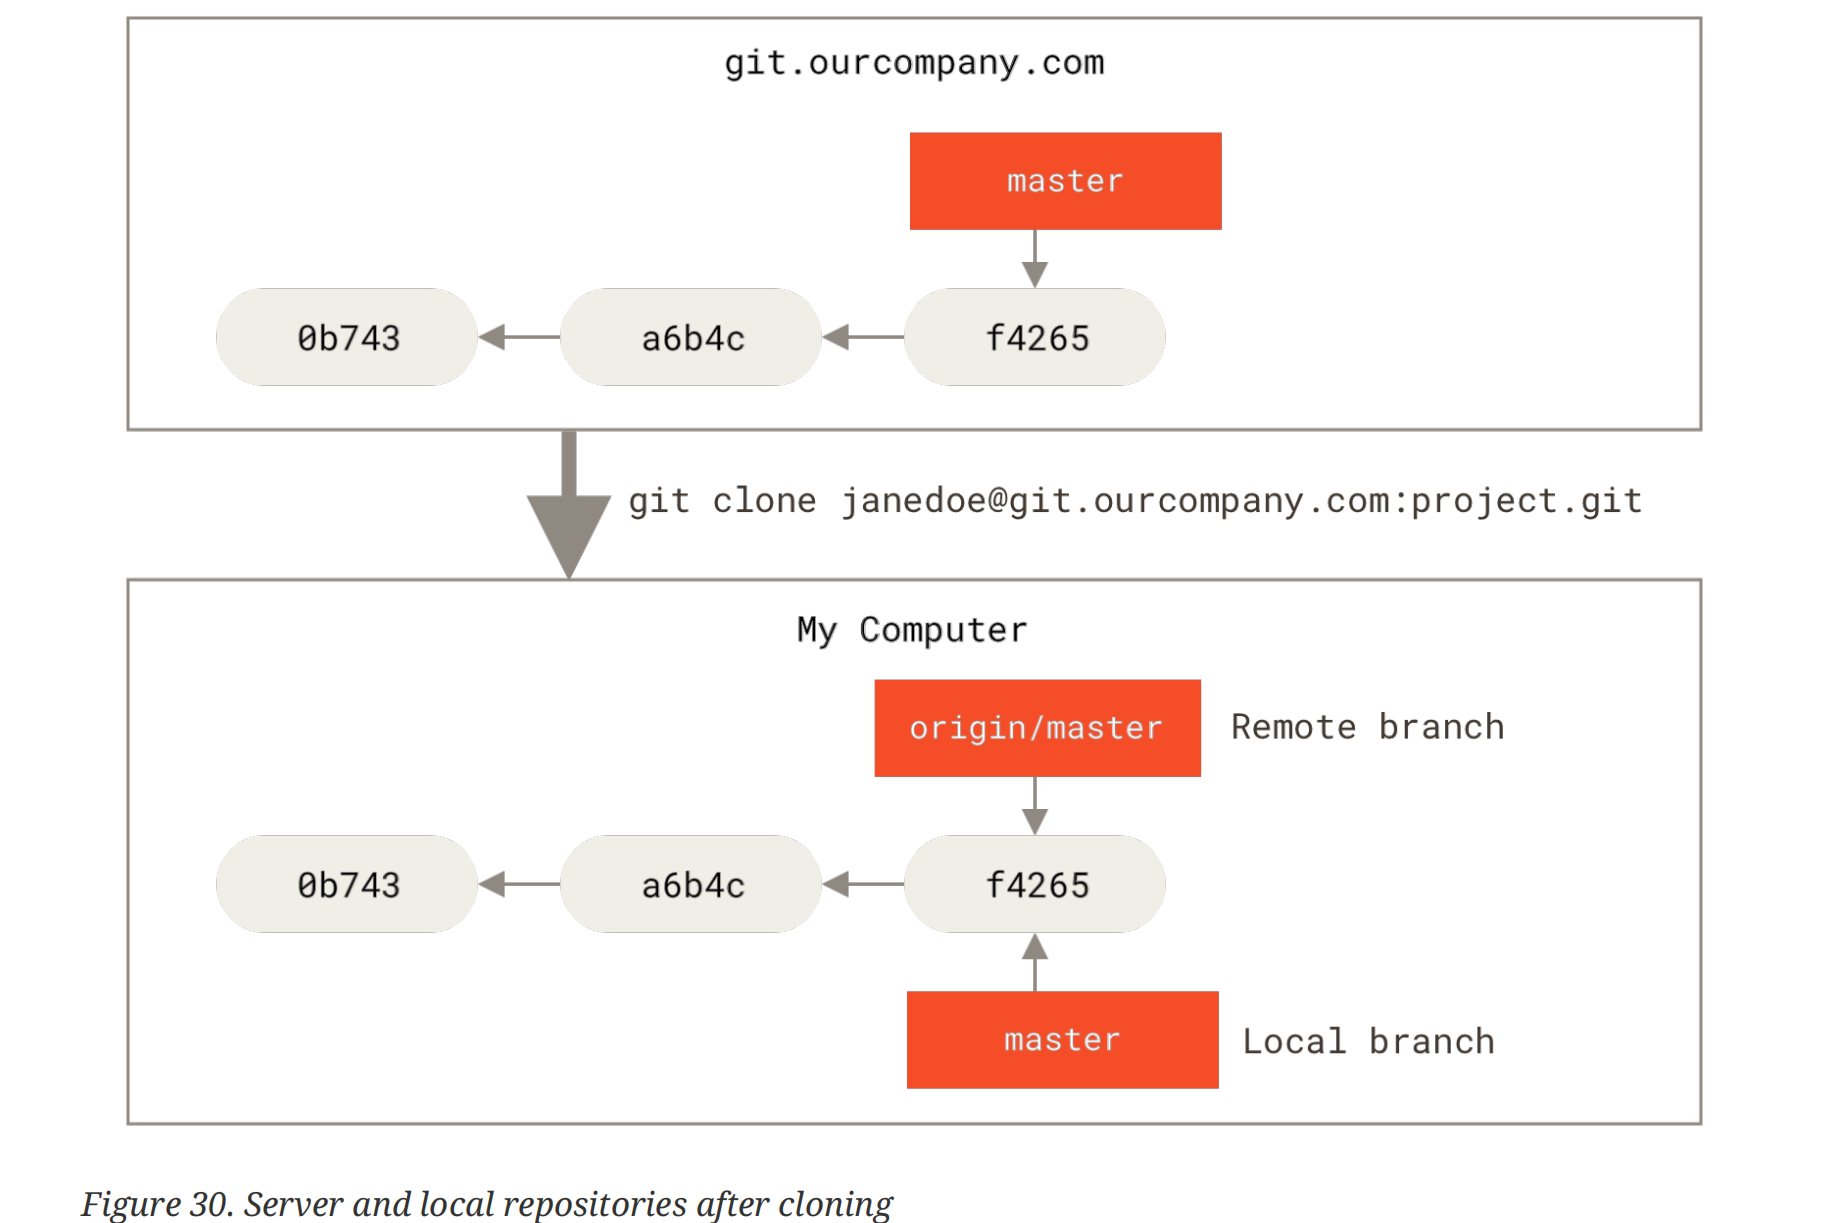
如果我们在拉下来的分支上提交一些 commits,同时其他人在远端库中提交另外一些 commits,虽然origin/master分支仍指向 clone 时的状态,但实际上和远端分支已经不同了。如果我们使用fetch来使本地与远端同步:
1 | git fetch <remote> |
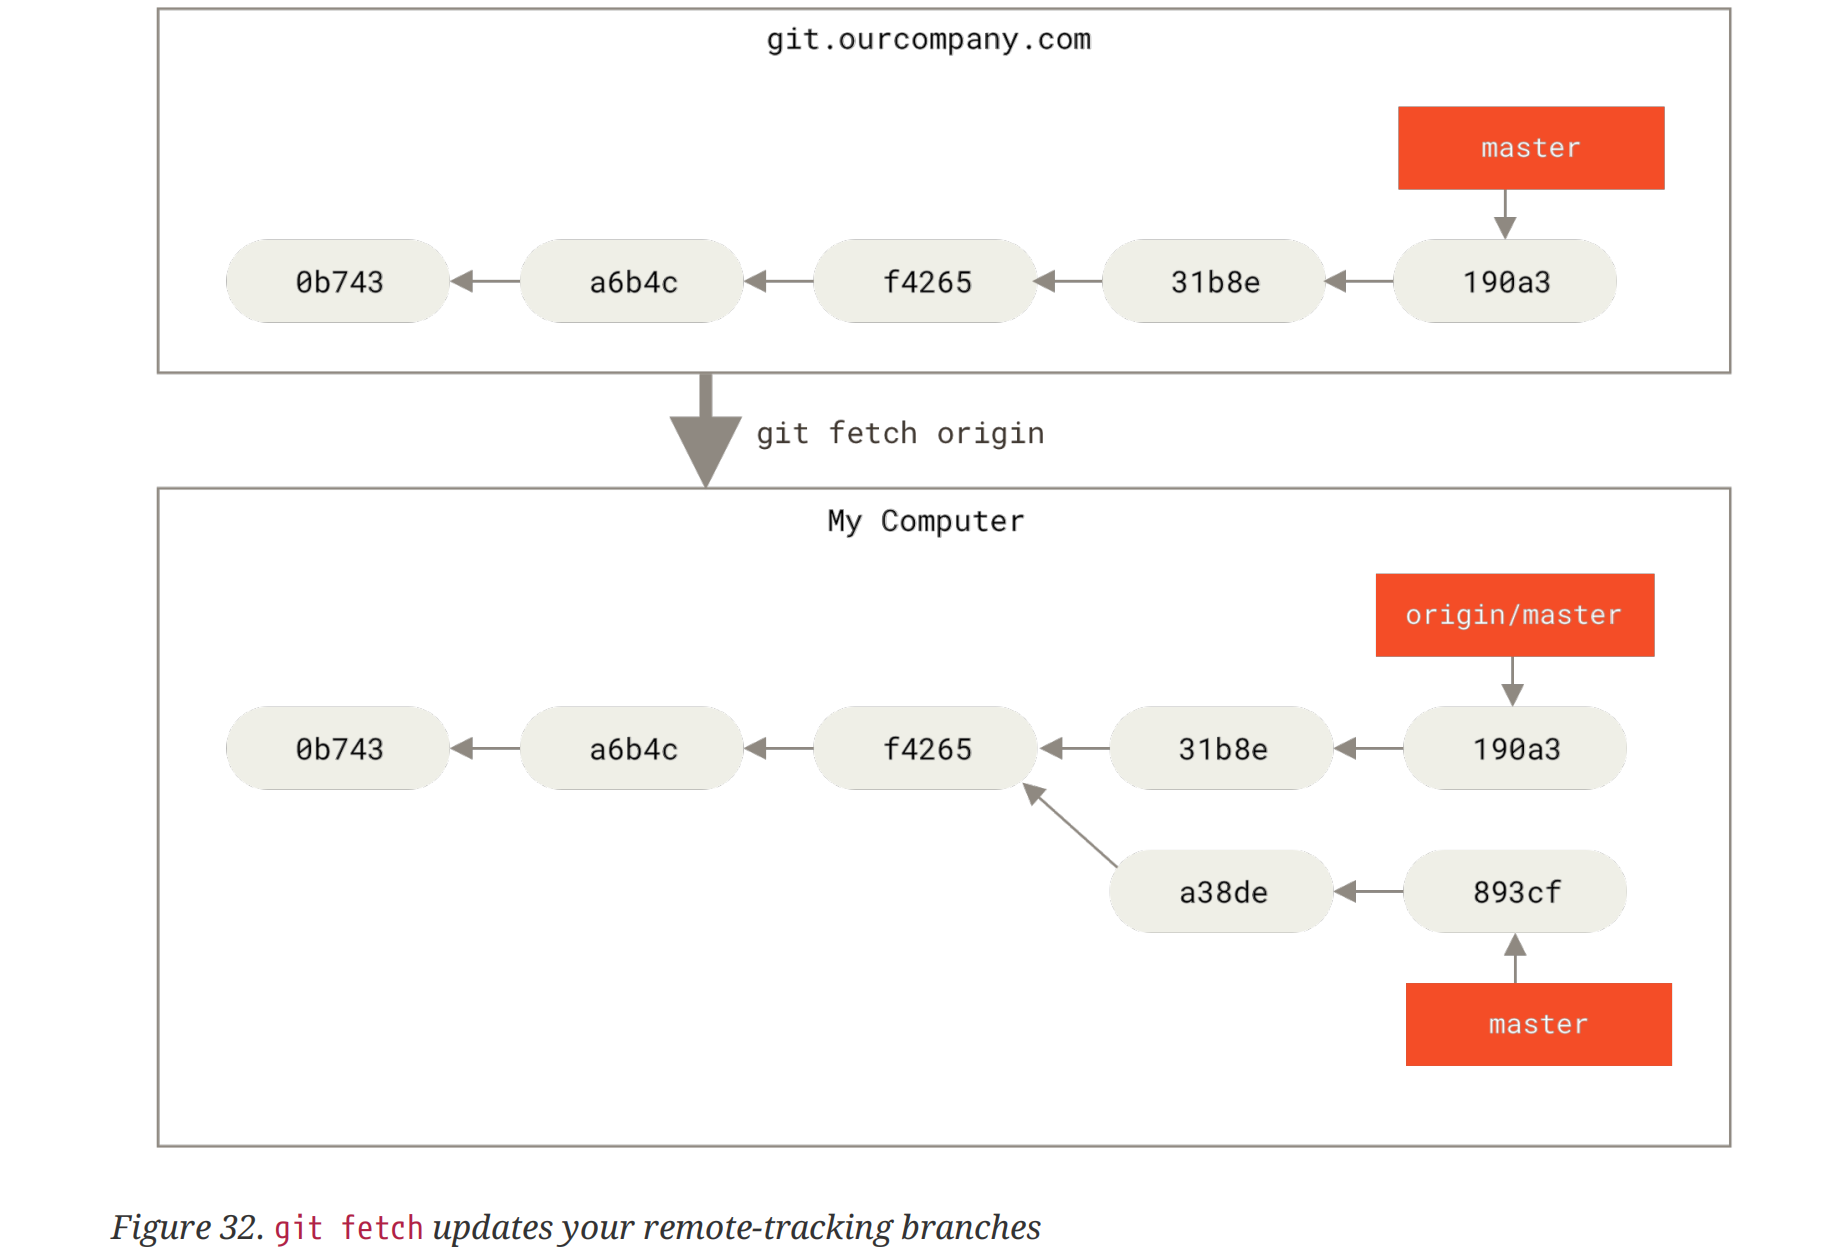
This command looks up which server
originis, fetches any data from it that you don’t yet have, and updates your local database, moving yourorigin/masterpointer to its new, more up-to-date position.It’s important to note that when you do a fetch that brings down new remote-tracking branches, you don’t automatically have local, editable copies of them.
虽然远端分支无法修改,但是可以merge到我们需要的分支中:
1 | merge into your current branch |
Pushing
git 不会自动地将本地的分支和远端的分支进行同步,所以说我们需要自己通过push来实现。
1 | git push <remote> <branch> |
第一个操作将本地分支推到远端并且将其命名为和本地分支一样的名字,而第二个分支则允许推到远端时将分支命名为别的名字,因为即使两个分支是相互追踪的状态,也是可以具有不同名字的。
Tracking Branches
Checking out a local branch from a remote-tracking branch automatically creates what is called a “tracking branch” (and the branch it tracks is called an “upstream branch”).
对于 tracking branch 我们进行git pull操作,相当于是fetch+merge的一种简写 (shorthand),因为 git 知道从哪个远端仓库拉取数据,并且将分支 merge 到哪个本地分支里!
我们可以创建一个本地分支来追踪 (track) 远端仓库的分支:
1 | create a tracking-branch and push to synchronize |
当然,也可以让一个已有的本地分支追踪远端分支:
1 | option: '-u' or '--set-upstream-to' |
注意:上面两个操作的前提都是通过fetch已经将远端的分支记录在本地,作为不可修改的远端分支(如上面图例中的origin/master)。这也是可以理解的,如果我只能观察本地的仓库,那我怎么会知道远端仓库有一个新的分支呢!当然如果这个远端仓库的分支我们已经有了记录,也是不需要fetch的。总之我们的操作对象一定是要本地有记录的。
![]()
It’s important to note that these numbers (ahead, behind, commit…) are only since the last time you fetched from each server!
Pulling
再次回顾下一下,fetch操作仅仅将远端的数据下载到本地,并不会对当前的工作目录进行修改,所以需要我们自己手动merge。但如果我们的分支是 tracking branch,那就不需要这么麻烦了,直接git pull 就能合fetch、merge为一。虽然操作方便 (short hand),但实践中还是可能遇到 merge conflict 等其他问题,所以最好还是一步步来进行。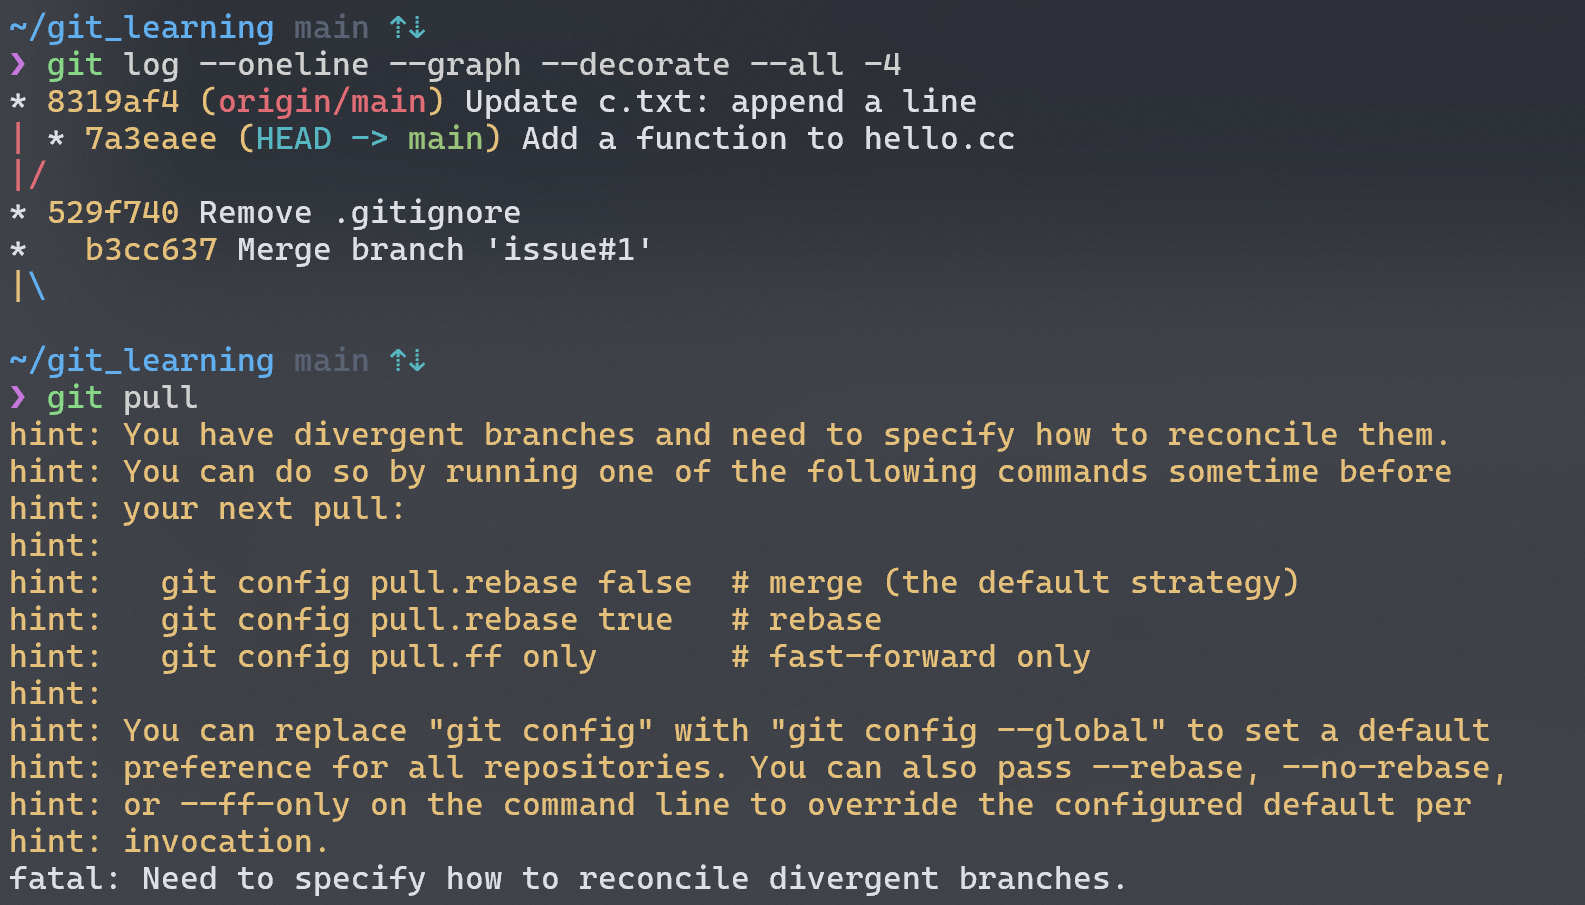
Rebasing
除了merge以外,还有一种操作可以合并分支:rebase。考虑和 merge 一样的分支情况: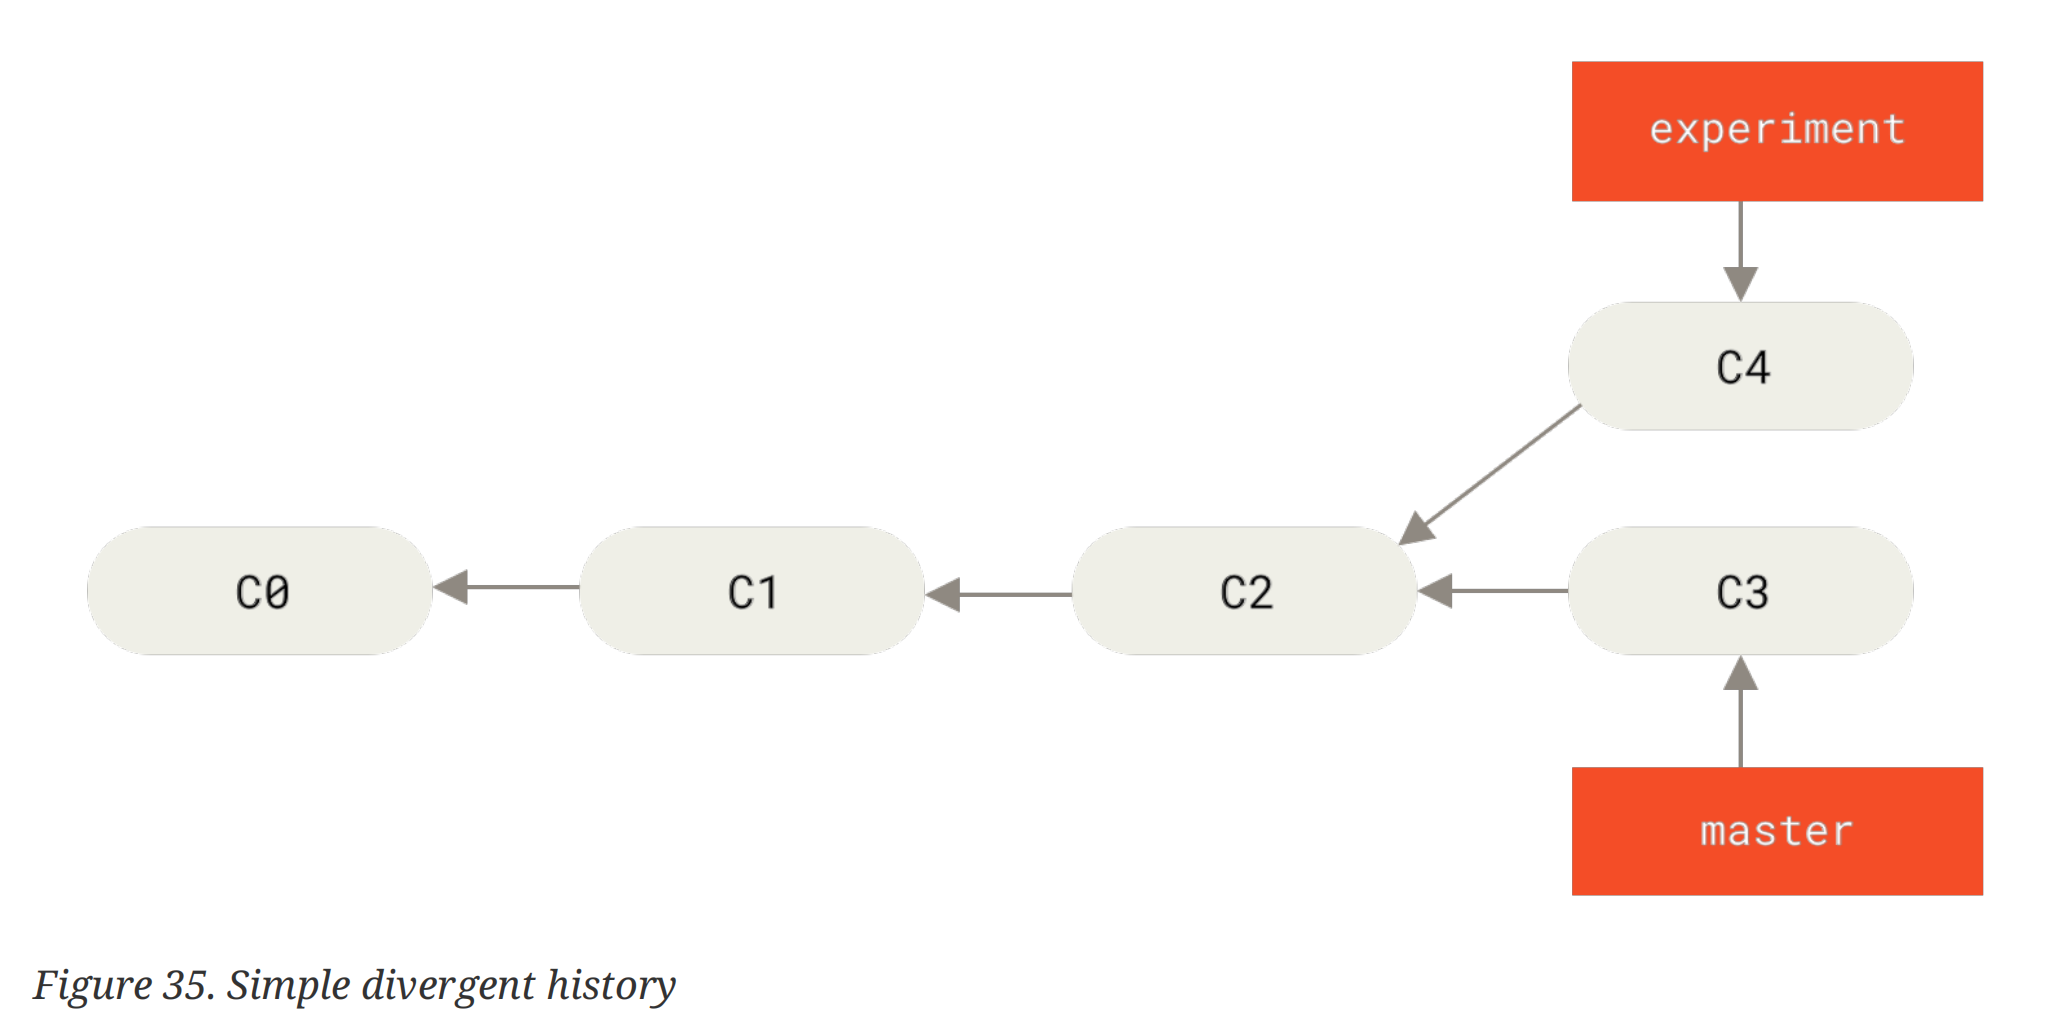
在merge操作中,我们会解决 conflict 得到一个新的 merge commit。而rebase操作则是将experiment分支上的提交重新作用 (replay)一次在master分支上:
1 | checkout to the branch you need to rebase |
With the rebase command, you can take all the changes that were committed on one branch and replay them on a different branch.
官方文档对rebase操作的讲解是这样的:
This operation works by going to the common ancestor of the two branches (the one you’re on and the one you’re rebasing onto), getting the diff introduced by each commit of the branch you’re on, saving those diffs to temporary files, resetting the current branch to the same commit as the branch you are rebasing onto, and finally applying each change in turn.
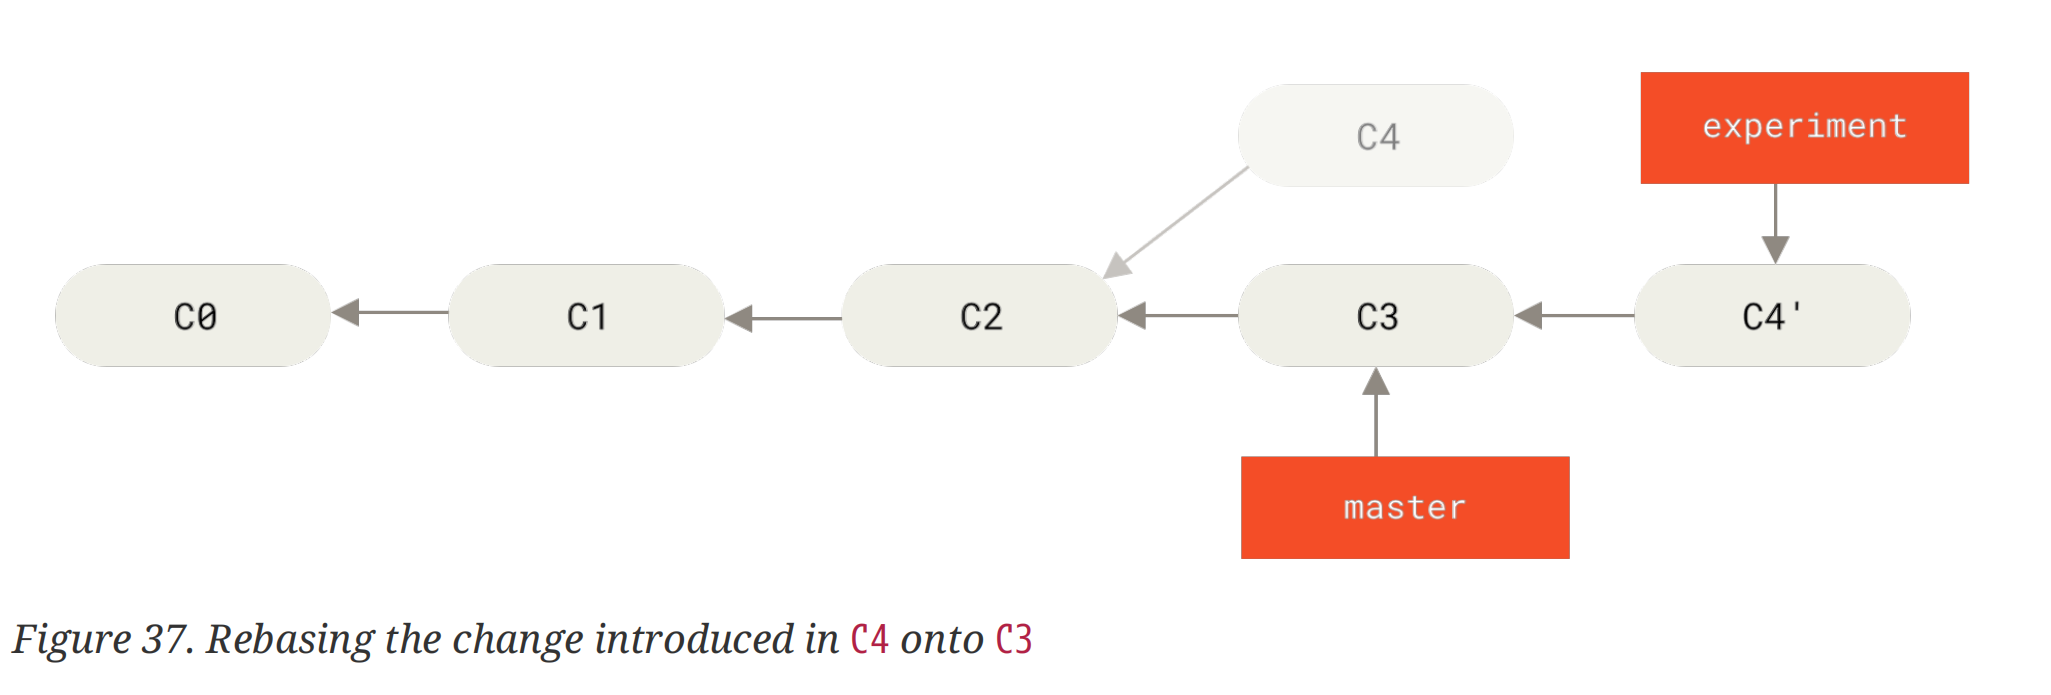
首先将所处分支上所有非共有 commits 的修改保存在一个暂时的文件里,然后将该分支的指针指到需要 “rebase onto” 的那个分支,再将刚刚保存的修改按顺序作用在分支上。这么读起来,好像rebase没有merge那么清晰地讲解如何处理两个分支间的冲突的。直觉能想到的问题是:如果我在两个分支上对同一文件进行了修改,那么在"replay"后会实现怎么样的取舍?
Now, the snapshot pointed to by
C4'is exactly the same as the one that was pointed to byC5in the merge example. There is no difference in the end product of the integration, …
Pro Git 说rebase的结果是和merge操作相同的,并没有解答问题。所以我们直接动手来制造 conflict 来看看rebase会发生什么: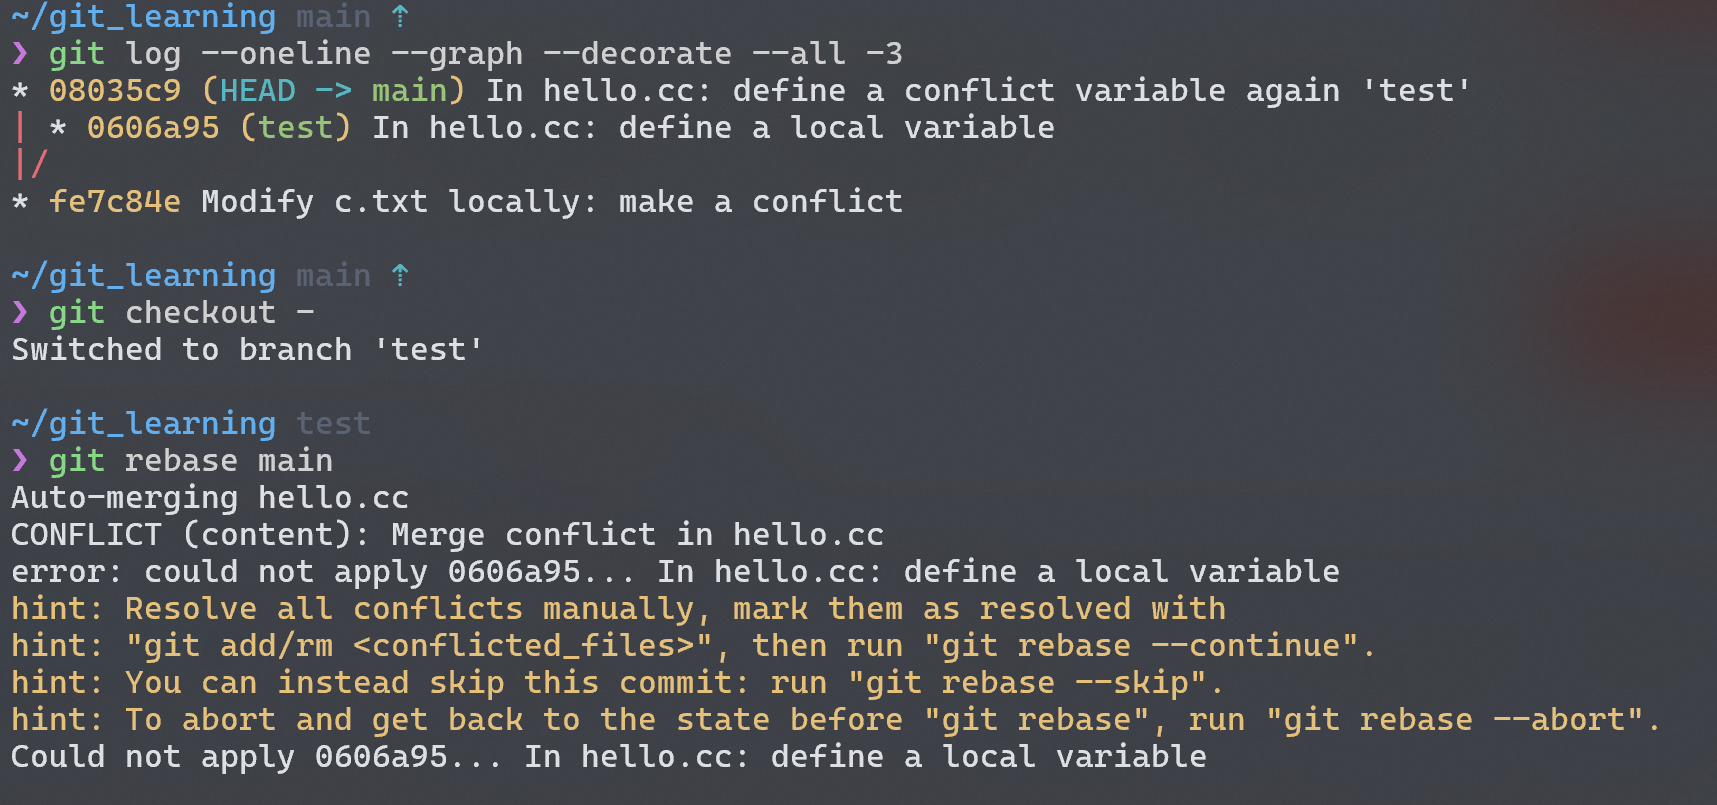
原来无论是merge还是rebase都是会发生冲突的!此时git status查看一下: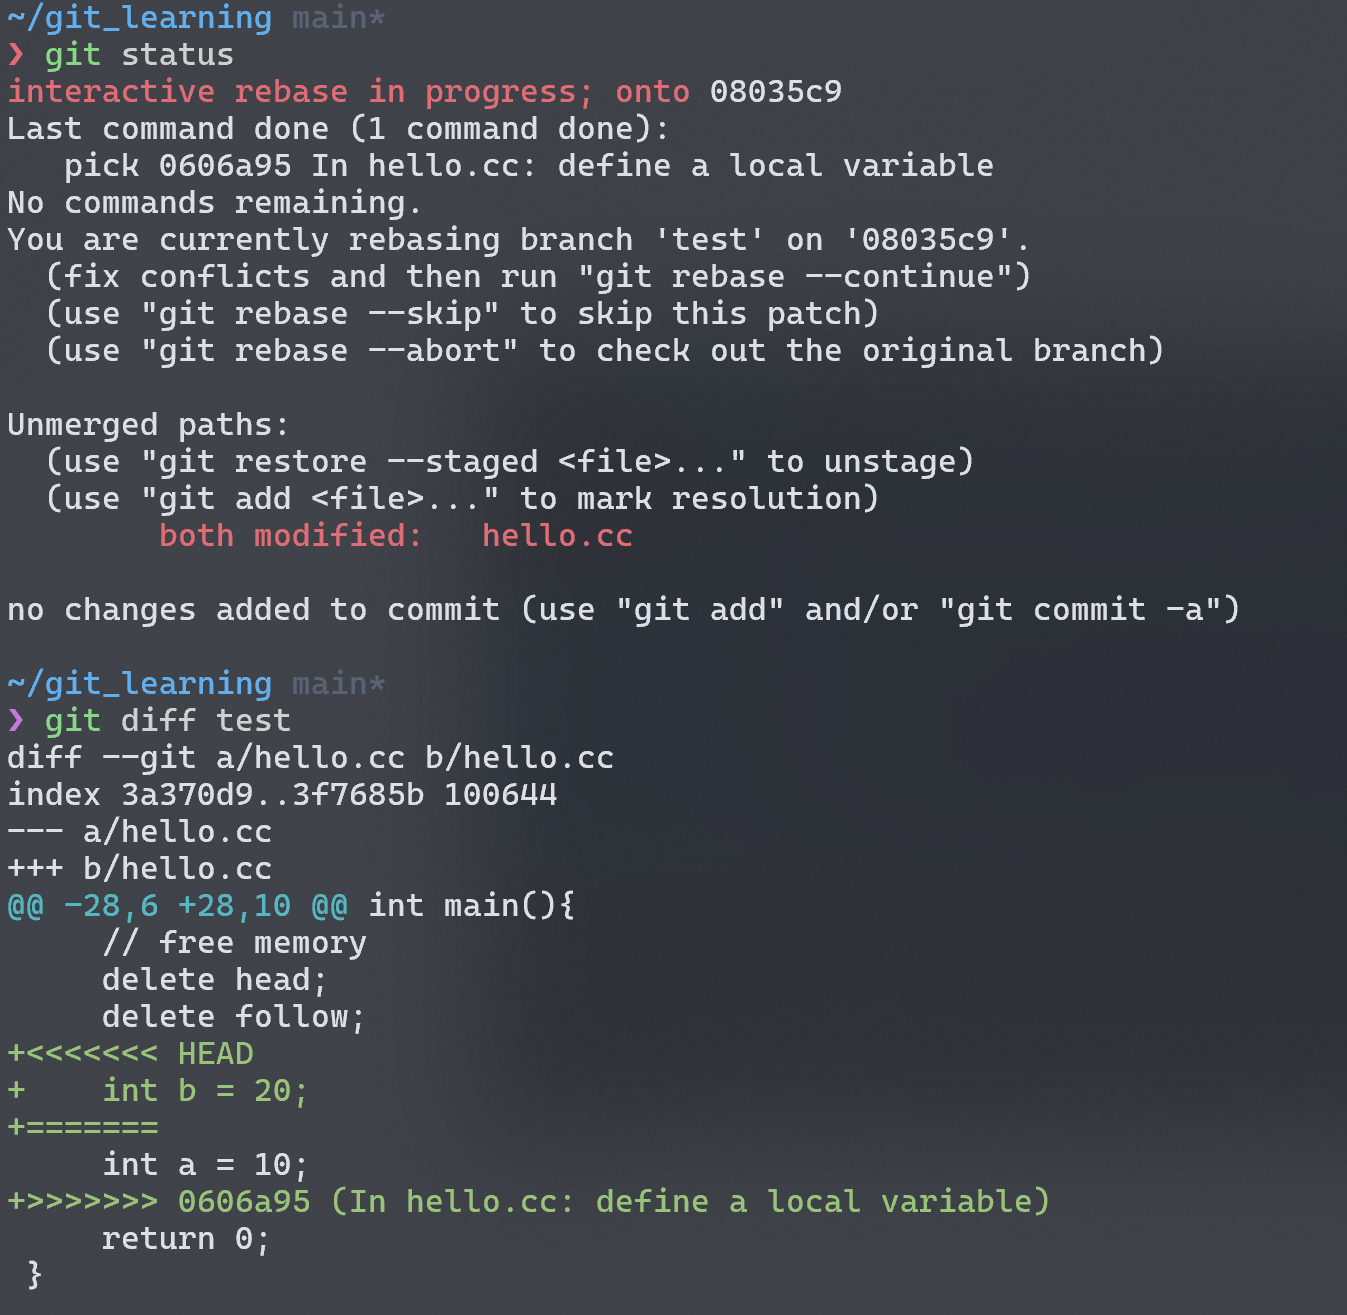
在unmerge paths的 header 下,git 明确地告诉了我们对同一文件的同一地方进行了修改,需要手动改一下文件,add后提交 😄 。所以文中所说的"the same"的意思是说我们通过同样的策略消除冲突,最终得到的 snapshot 和merge操作得到的 snapshot 是一样的。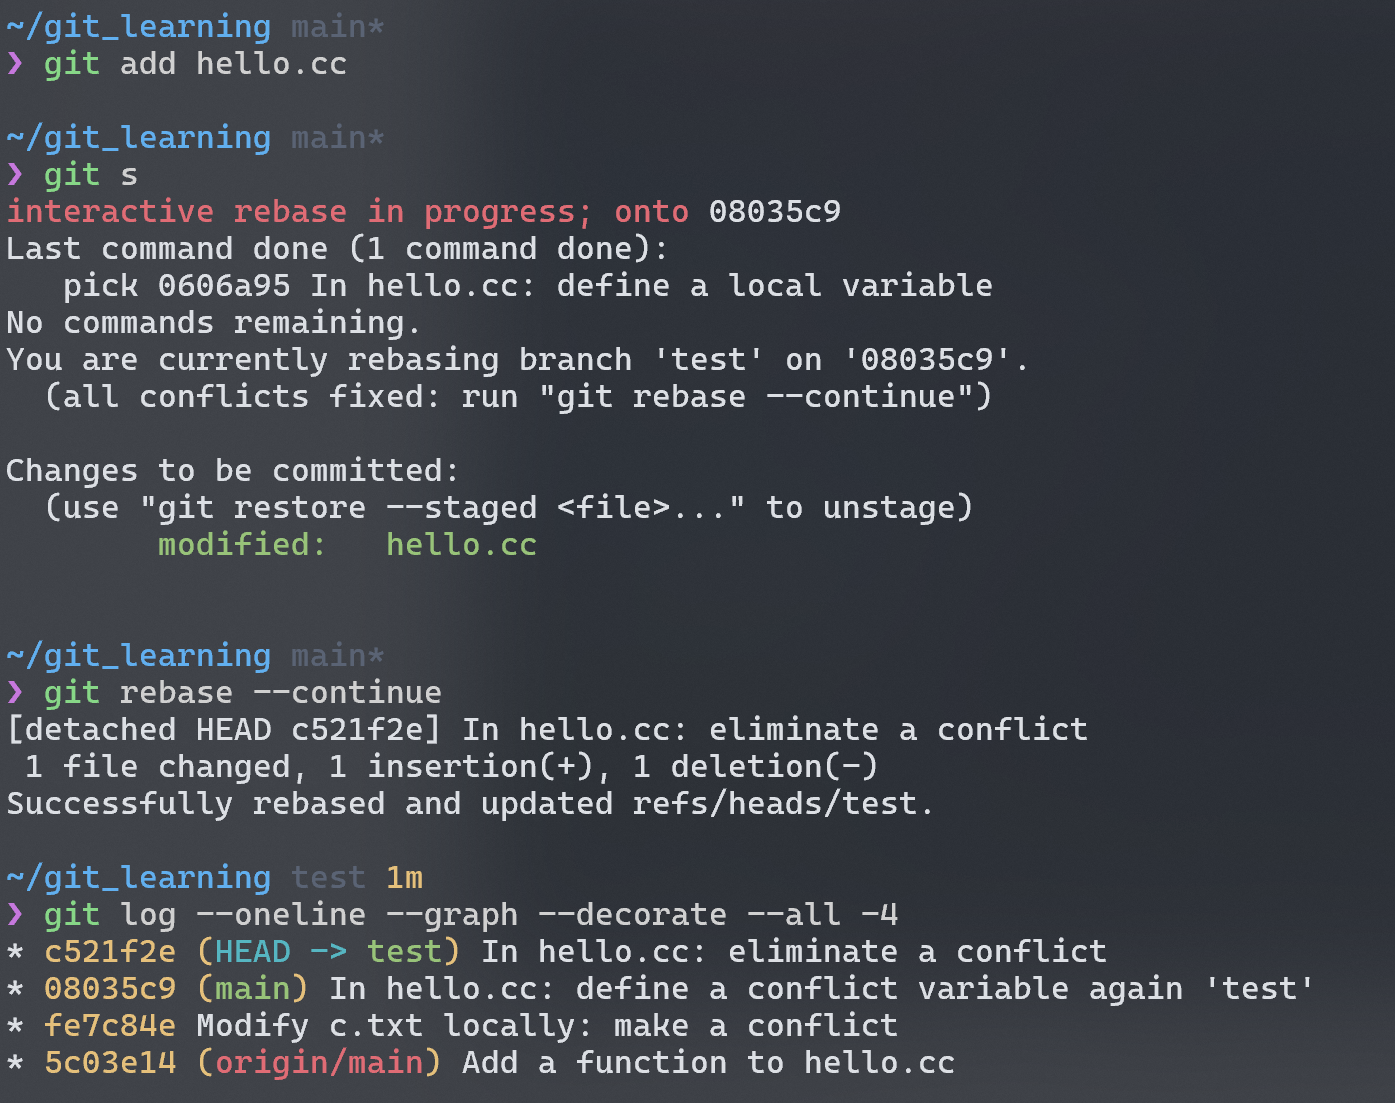
很高兴,我们解决了rebase的冲突!那么将这个情况延申到本地分支和远端分支呢会发生?一样的问题,一样的操作!我们只需要把例子中的test换做某个远端分支(例如origin/main),我们可以使用fetch+merge的 combo,这就相当于本地分支的merge了,或者直接git pull --rebase将远端分支放到当前分支后面,相当于本地的rebase。遇到 conflict 问题还是同样要解决的!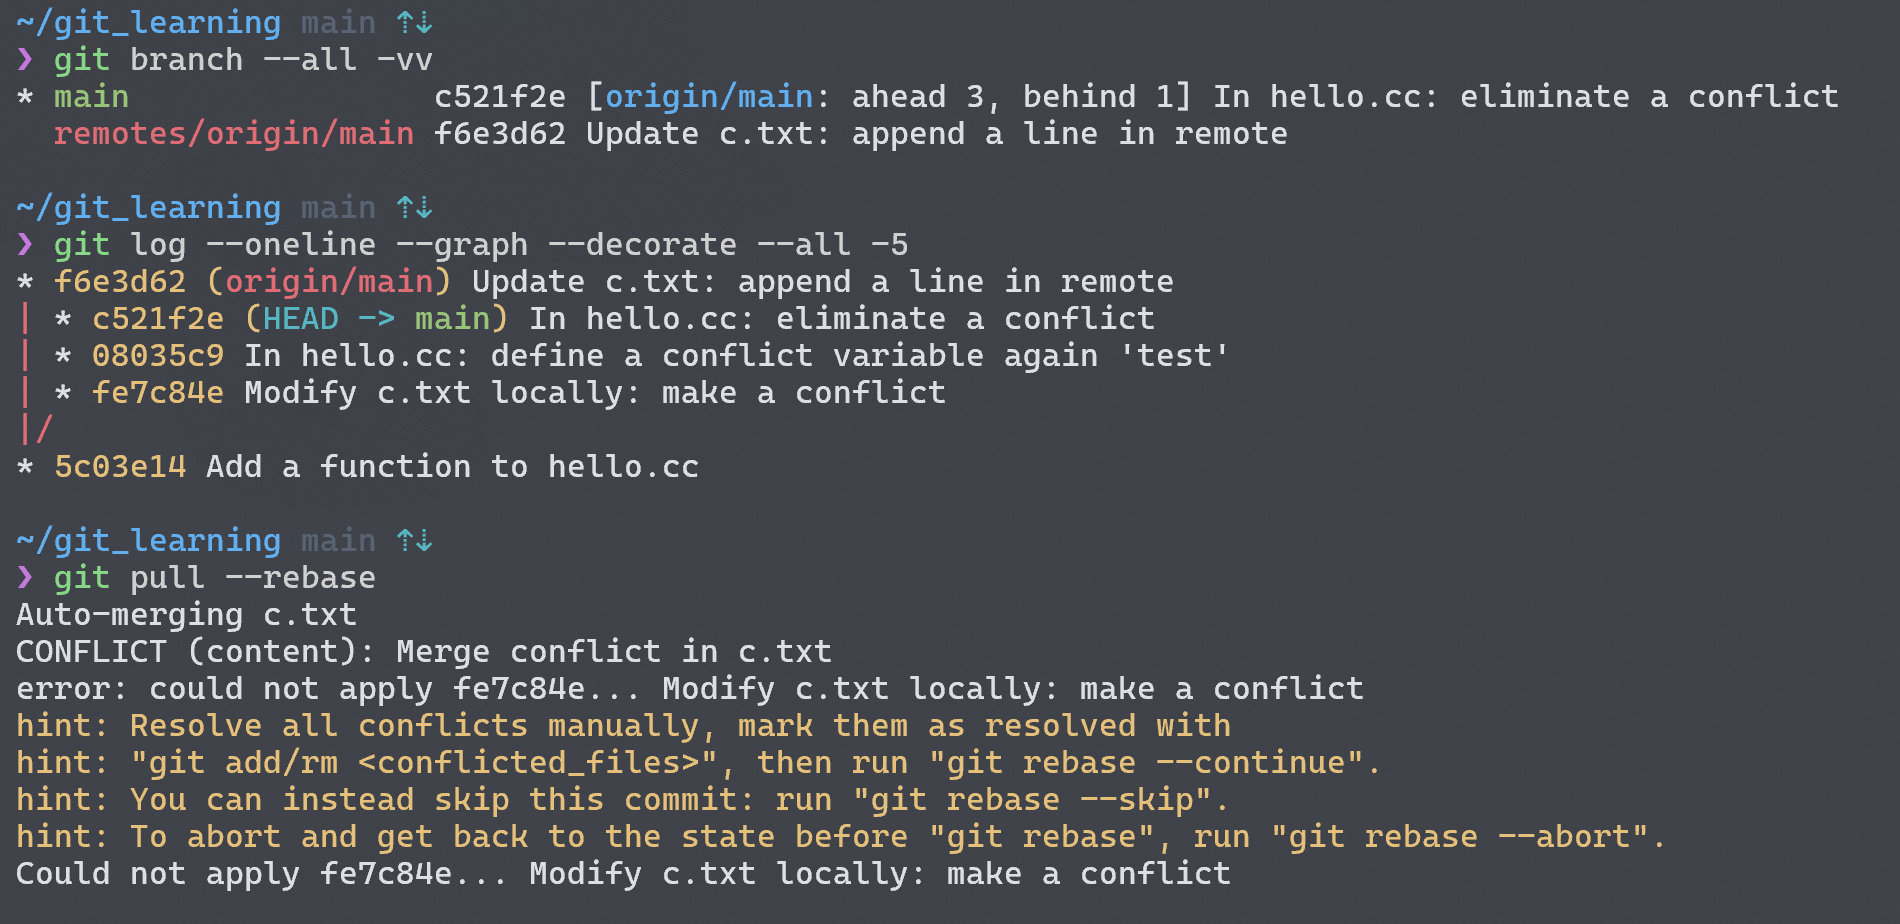
rebase和merge相比,它能使得我们的历史看起来更加线性干净。一些人认为merge更好,因为它能保存整个 commit 历史,能从中知道每一次commit、merge的过程和结果,将历史视为"record of what actually happened";另一些人则认为rebase更加号,它阐述的是整个项目的过程是如何一点点构建的,就像我们不会把一个初稿直接提交一样,so why show your messy work? 他们将历史视为"story of how your project was made"。那么,你偏好哪一种呢?
总结
这篇博文只是总结解释了 Git 的一些基础概念和操作,而没有总结 Git 具体的实现,如 protocol、internals 等。当然啦我也没看就是了,如果感兴趣的话可以直接在git 官网读 Pro Git,个人感觉讲的非常之好,边动手边学习,读下来真的受益匪浅。由于我是读的英文版而且还整理博客笔记,算起来花了有 20h+(主要是英语太菜了),不过在这些学习时间里我都感觉非常充实!所以,我能算得上听说过 Git 了吗?
